Airfix Fokker F-27-500 LADS

Show us what's on the bench

Airfix Fokker F-27-500 LADS

Postby RayS » Sat May 01, 2021 3:28 pm

Next on the bench is the Airfix Fokker F-27 converted to a Laser Airborne Depth Sounding aircraft operated on behalf of the Royal Australian Navy.
Image

I will be using a Hamilton Hobbies conversion as well as some replacement white metal under carriage legs.
Image

Decals are from Southern Sky
Image

From Wiki
The Laser Airborne Depth Sounder (LADS) Flight was a unit of the Royal Australian Navy. Unlike the rest of the flying units of the RAN, it was not controlled by the Fleet Air Arm from HMAS Albatross (NSW), but instead fell under the operational control of the Australian Hydrographic Service at HMAS Cairns (QLD), providing a platform for the operation of the laser airborne depth sounder system. in 2009 the F-27 was replaced by a DHC Dash 8 which operated until 2019.

I spent a few hours this morning making a start on the F27. The conversion includes parts missing from the Airfix kit like intake scoops and a couple of fairings at the rear of the horizontal stabs. You also get a replacement tail fillet, MLG legs and wheels (copies of the ESCI kit parts) and the fuselage plugs to make the -200 into a -500.
Image

The parts were separated from their pour blocks and cleaned up
Image

I also have white metal gear legs which are also copies of the ESCI which I will use instead of the resin parts
Image

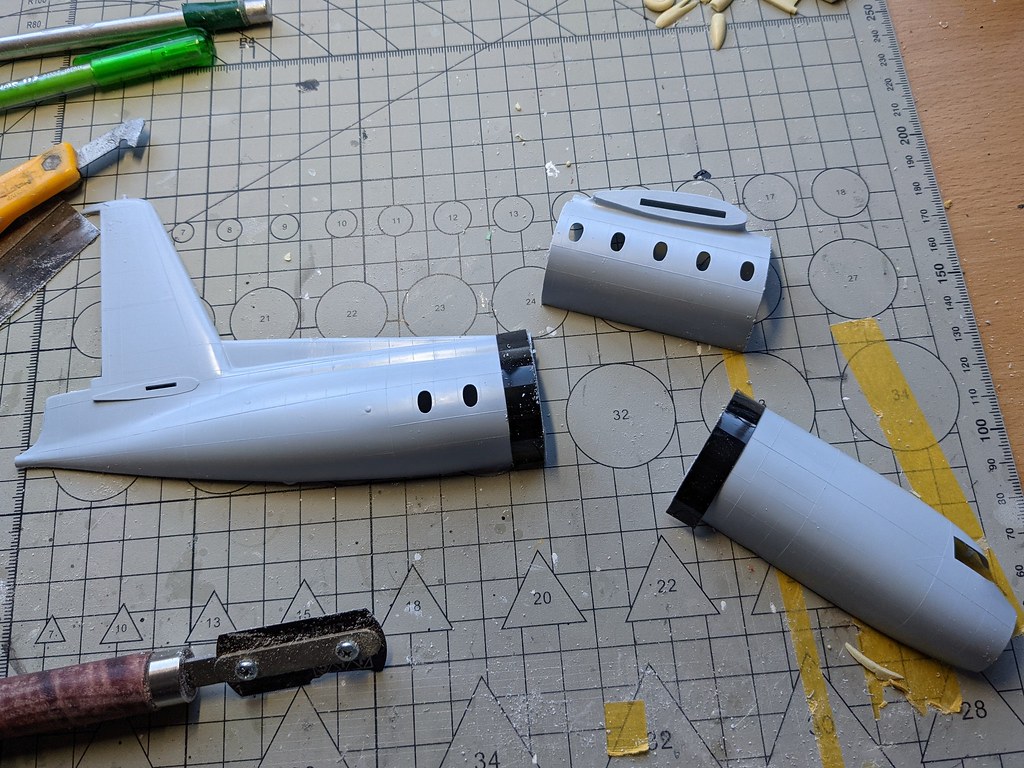
It was then time to do the surgery on the fuselage making the cuts and removing the undersized tail fillet
Image

My preferred method is to use Dymo label tape to mark the line, scribe a line as a guide for a razor saw and then to finish off making the cuts with the saw.
Image

I glued each subassembly together and then started to connect the parts
Image

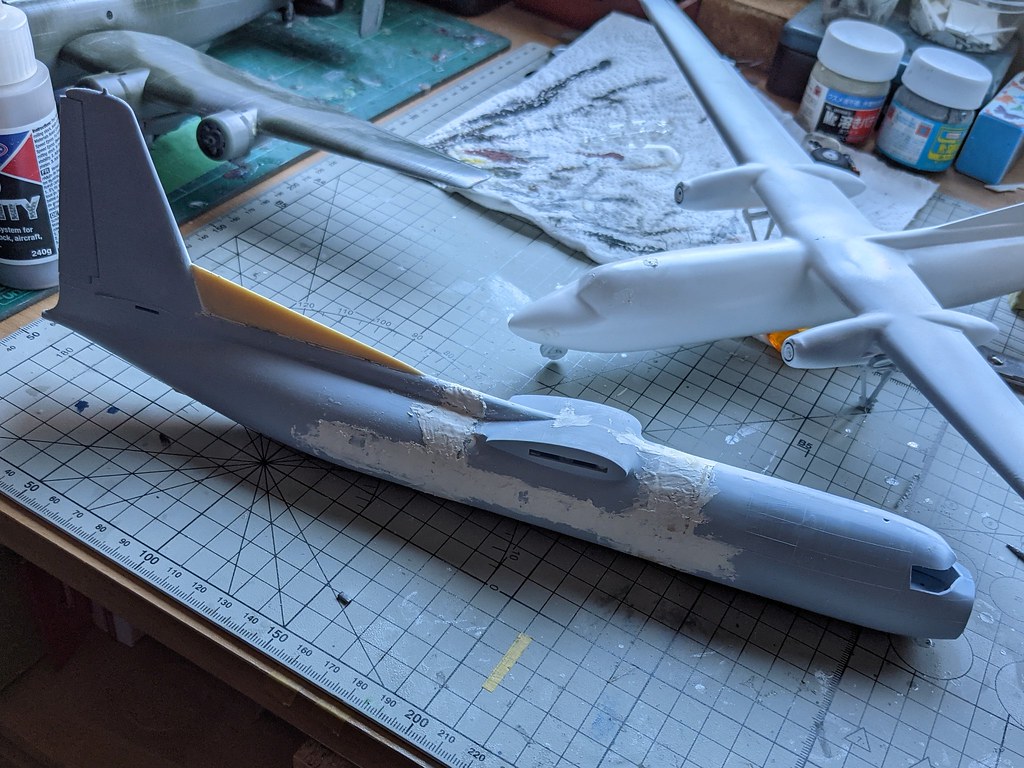
Some putty added, which was sanded
Image

Which was sanded and round two of putty going on, this time also puttying the cabin windows as they are undersized and I will be using decals anyway.
Image
Ray

Image
User avatar
RayS
 
Posts: 2200
Joined: Thu Apr 17, 2014 10:24 am
Location: RAdelaide!... YPAD

Re: Airfix Fokker F-27-500 LADS

Postby F-27pax » Sun May 02, 2021 10:54 am

I'm looking forward to seeing progress on this one, it should look excellent.
F-27pax
 
Posts: 973
Joined: Fri Apr 18, 2014 11:40 pm

Re: Airfix Fokker F-27-500 LADS

Postby RayS » Sun May 02, 2021 12:27 pm

Thanks Leigh

On to the white metal gear, I had to modify the mount holes of to take the ESCI part copies
Image

I also got the flying surfaces assembled
Image
Image

And initial sanding priming and refilling done, I also added the rear door. I'll add the nose and front door once I figure out how much nose weight is required.
Image
Ray

Image
User avatar
RayS
 
Posts: 2200
Joined: Thu Apr 17, 2014 10:24 am
Location: RAdelaide!... YPAD

Re: Airfix Fokker F-27-500 LADS

Postby RayS » Sun May 02, 2021 9:35 pm

So I jumped ahead a little this arvo, most of the sanding a filling and the the major assembly done bar the nose cone. I also added the resin intakes down the back on both sides which replaced the moulded on one in on the kit.
Image
Image

Now to figure how much nose weight required... about this much.
Image

I left the front entry door and nose cone off to allow it all to go in. Now to fit the nose which is way over size and has the wrong profile if you build OOB. I started another F27 kit soon after the last issue was released which has been a primary fixture one shelf of doom for some time (well 11 years in fact).

Here is the stalled build with my current one, I hope to finish it along with this one now. One thing that did bug me were the overly thick pitot probes on the wings, so they will be replaced with some tube on both F27s.
Image

Here is a shot of how much the nose can be brought down to correct the shape as the retooled nose plastic is so thick (picture from my older build).
Image
Ray

Image
User avatar
RayS
 
Posts: 2200
Joined: Thu Apr 17, 2014 10:24 am
Location: RAdelaide!... YPAD

Re: Airfix Fokker F-27-500 LADS

Postby RayS » Tue May 04, 2021 12:26 pm

The nose has gone on the F27-500, all I can say is what were the tooling guys thinking! Such a mess.
Image

After a little time with putty, files and sandpaper it becomes presentable.
Image
Image

And then I added the LADs specific fittings
Image
Ray

Image
User avatar
RayS
 
Posts: 2200
Joined: Thu Apr 17, 2014 10:24 am
Location: RAdelaide!... YPAD

Re: Airfix Fokker F-27-500 LADS

Postby scoops » Thu May 06, 2021 11:03 pm

nice work Ray,

How would one be able to get one of these kits or have i missed one.

I'm looking at making it in 1/144 as i already have the decals.

cheers
Sean C
scoops
 
Posts: 55
Joined: Fri Oct 03, 2014 10:48 pm

Re: Airfix Fokker F-27-500 LADS

Postby RayS » Fri May 07, 2021 8:07 am

Cheers Sean,

I got this set about 10 years ago now, it is long OOP. It was made by a fellow in Sydney. If you are on Facebook you can look up Hamilton Hobbies and send him a message to see if he still has the moulds. Pretty sure he has not done it in 1/144.

Time for some antennas, I grabbed a couple of towel rails from the spares box (Ex-C-130) and modified to suit
Image

Added a couple of HF wire posts to the forward fuselage
Image

and installed more bits and pieces underneath which all needs a clean up once the paint sets
Image
Ray

Image
User avatar
RayS
 
Posts: 2200
Joined: Thu Apr 17, 2014 10:24 am
Location: RAdelaide!... YPAD

Re: Airfix Fokker F-27-500 LADS

Postby tor lives » Sat May 08, 2021 4:44 pm

Really interesting and educational so far Ray.
Thanks for posting.....you are essentially providing me with a "step-by-step" for my Fairchild/Hiller FH-227 project.
TOR
tor lives
 
Posts: 4280
Joined: Mon Apr 14, 2014 11:01 am

Re: Airfix Fokker F-27-500 LADS

Postby hrtpaul » Sun May 23, 2021 11:06 am

Nice work there Ray. And OMFG that nose :D :D :D
Head A/CAM Phantom Phanatic, Shit Stirrer and Karma Bus Driver toot fkn toot :twisted:
hrtpaul
 
Posts: 4165
Joined: Sat Apr 12, 2014 10:44 am
Location: Like I'm gonna tell you lot

Re: Airfix Fokker F-27-500 LADS

Postby RayS » Tue Nov 26, 2024 8:30 pm

I'm dragging this one out of the dark ages, time to finish it up.

Since the last update 3 years ago I had been priming it and sorting out seam issues. Last week I managed to get a good base coat on it.
Image

Today, before heading out ton the garden to do some upkeep I managed some masking and laying down the first colours
Image
Image

Next will be masking up the leading edges so the wings can be painted. I was worried the remaining parts of the build may have disappeared after a couple of moves but they were found and accounted for along with the decals.
Ray

Image
User avatar
RayS
 
Posts: 2200
Joined: Thu Apr 17, 2014 10:24 am
Location: RAdelaide!... YPAD

Next

Return to Member's Works in Progress

Who is online

Users browsing this forum: No registered users and 5 guests