1/48th scale HPH Concorde
Re: 1/48th scale HPH Concorde
![]() by Adam the Akrodude » Fri Sep 25, 2015 3:24 pm
by Adam the Akrodude » Fri Sep 25, 2015 3:24 pm
I do like that Master Model bling out of Poland (in reference to the pitot you've sourced). I just received my GAU-8 gun barrel assembly for my Hawg - this stuff is just "da Bomb"!
- Adam the Akrodude
- Posts: 2819
- Joined: Mon Apr 14, 2014 1:02 pm
- Location: 100,124,672,897 Bifrost Rd, Valhalla, Asgard
Re: 1/48th scale HPH Concorde
![]() by Ericg » Sat Sep 26, 2015 9:08 pm
by Ericg » Sat Sep 26, 2015 9:08 pm
Onto some more work.
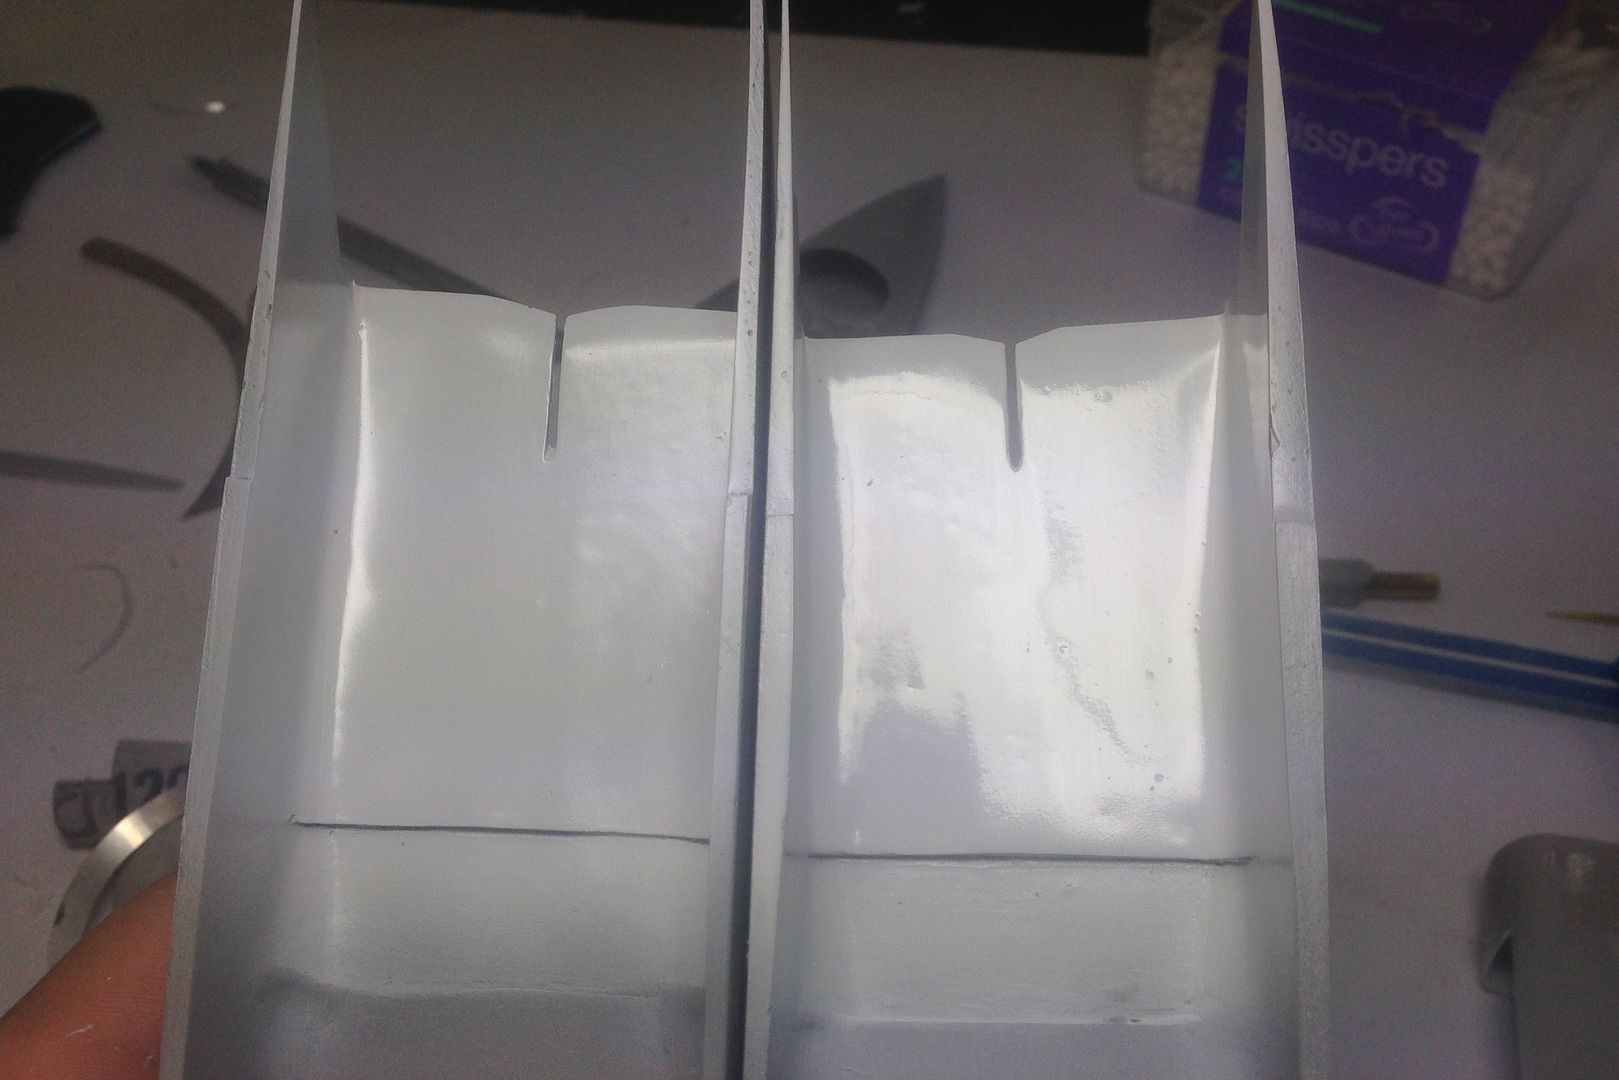
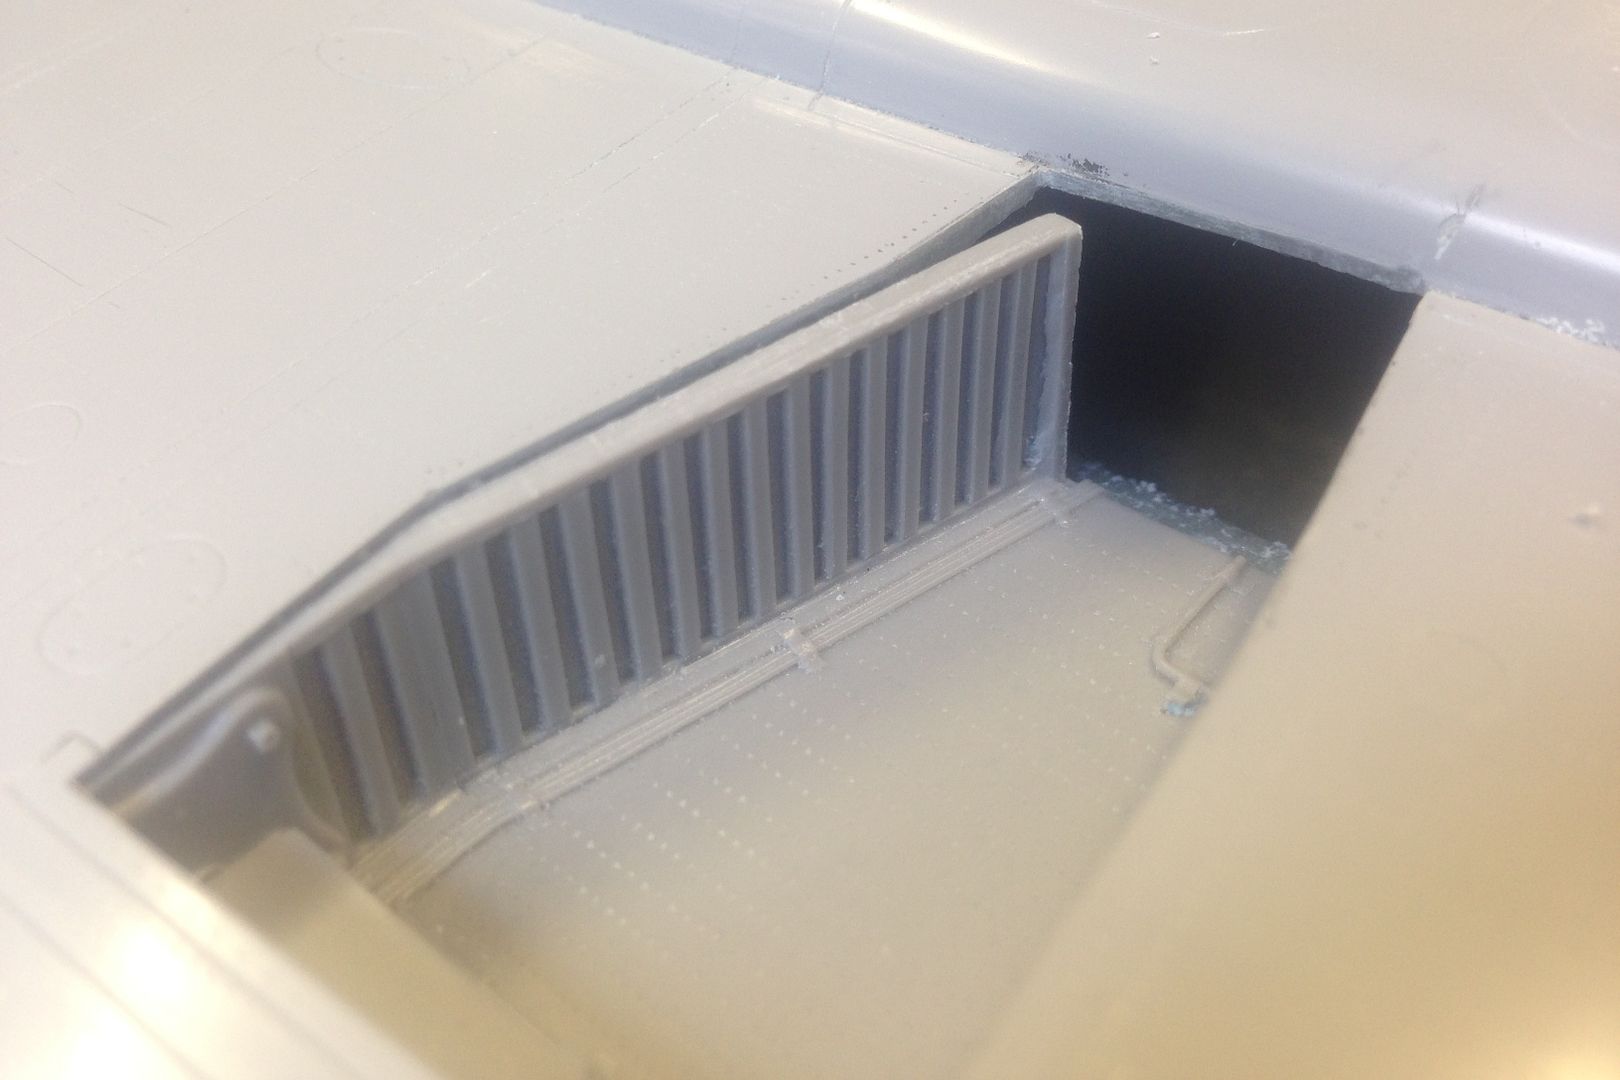
I have painted the insides of the intakes using my tried and tested Tamiya fine surface primer under 3 coats of Mr Surfacer White 1000 shot through my iwata airbrush followed by a coat of tamiya clear. I have then polished the surface with tamiya polishing compound buffed with a cloth polishing wheel in a cordless Dremel.
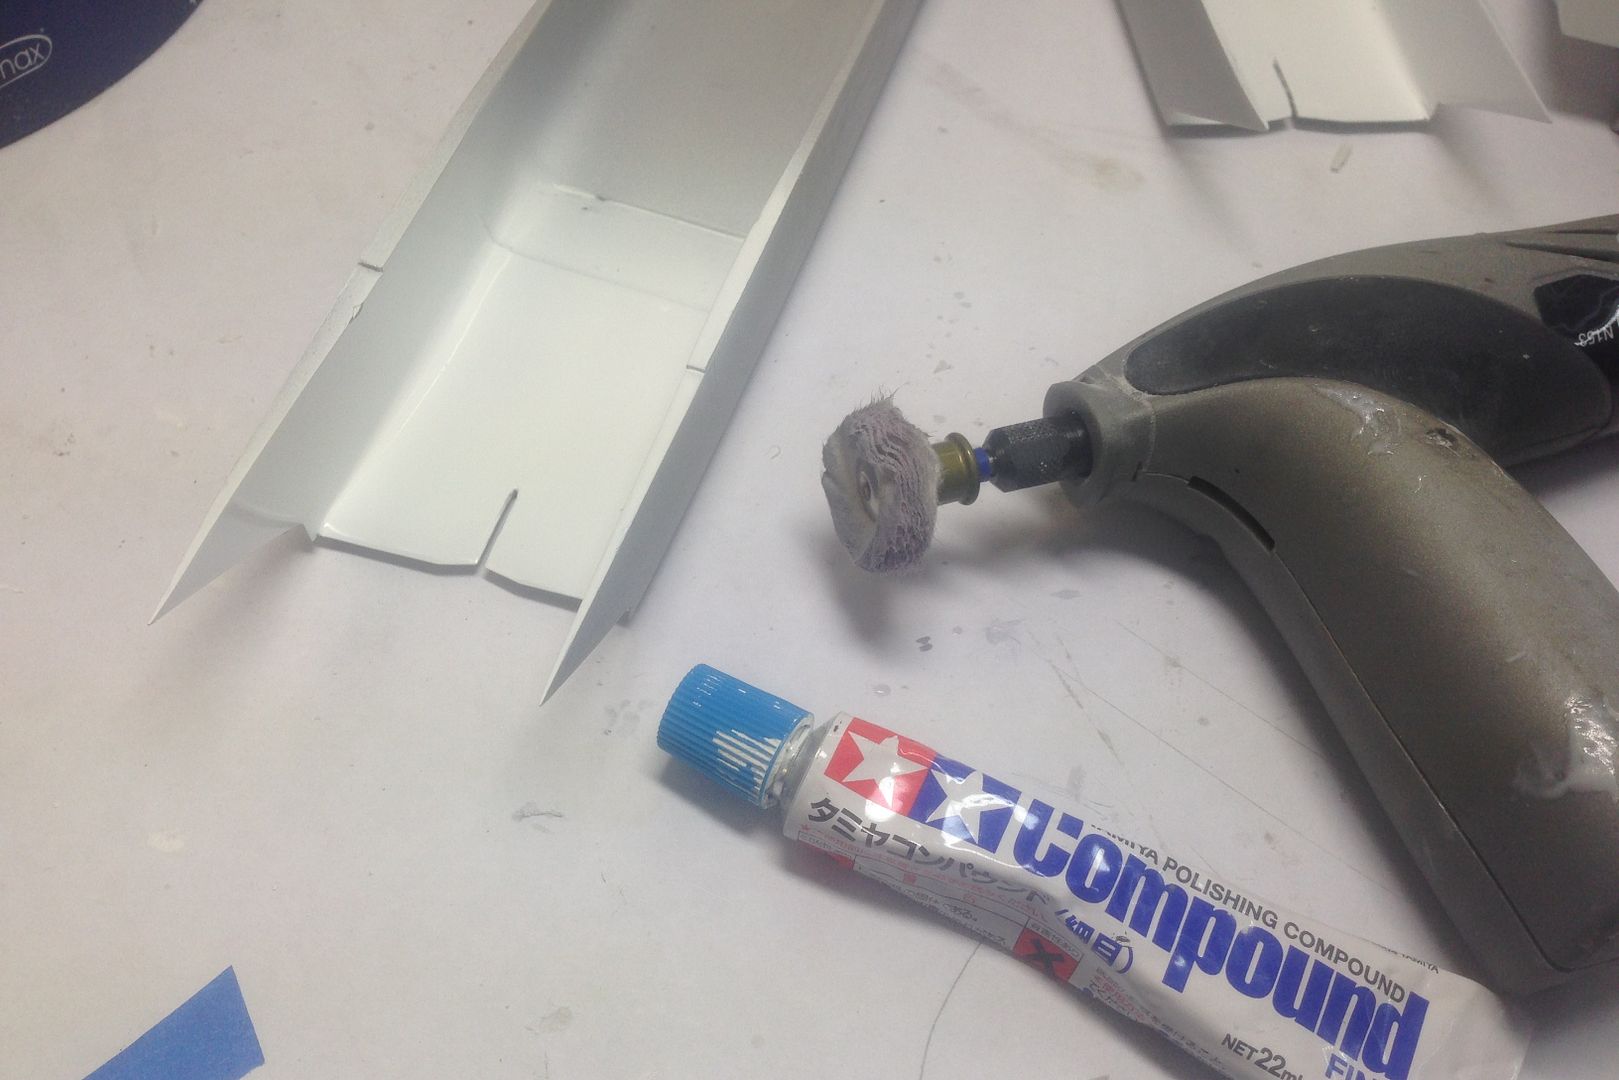
You can see the difference the polishing makes with the shine on the intake on the right.
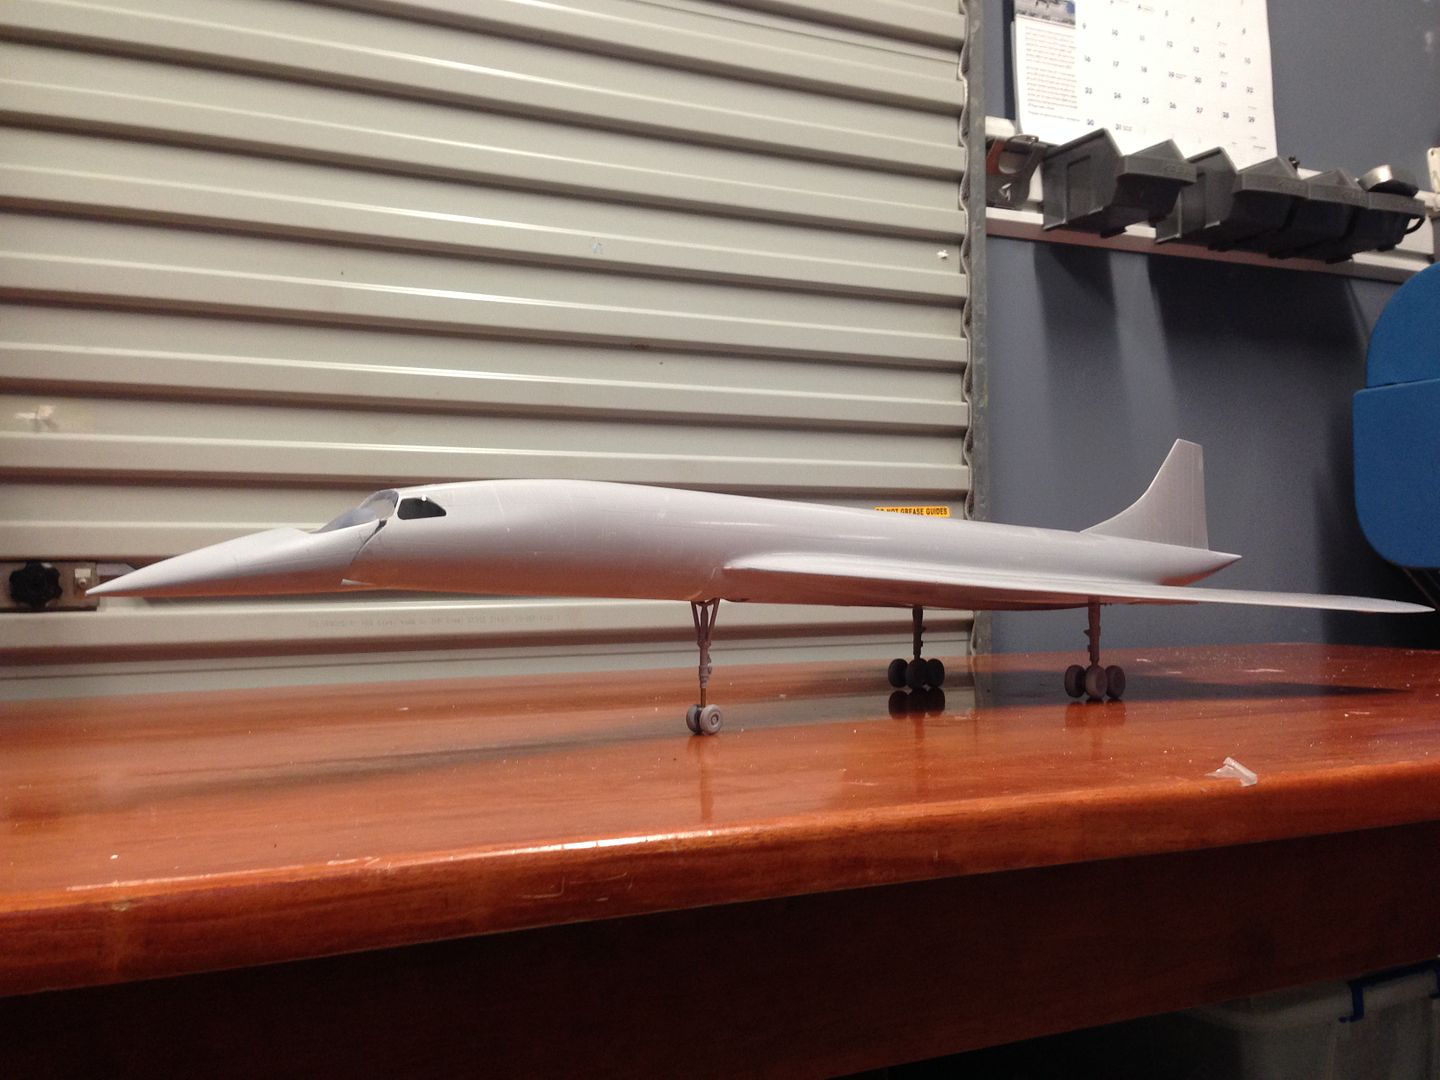
I am still on the fence as to how I want to depict the finished model, whether in flight, parked or at the point of takeoff. I reckon it will look cool at the point of just before lift off and am hoping to achieve that look. There are a number of challenges to overcome however, and this is one of them.
The undercarriage has been designed with the model parked, so the nose gear oleo will need to be extended if it is to be represented as per the above. The kit gear has brass tube embedded into the resin parts for strength.
I cut the oleo from the nose gear leg and immediately ran into a problem where the tube that is in the leg is offset towards the front, so it wasn't going to be as easy as sliding in some new metal and building up from there.
I was able to drill in some smaller diameter rod and then extend the oleo 4mm which I reckon will look about right for a nose gear that has no weight on it.
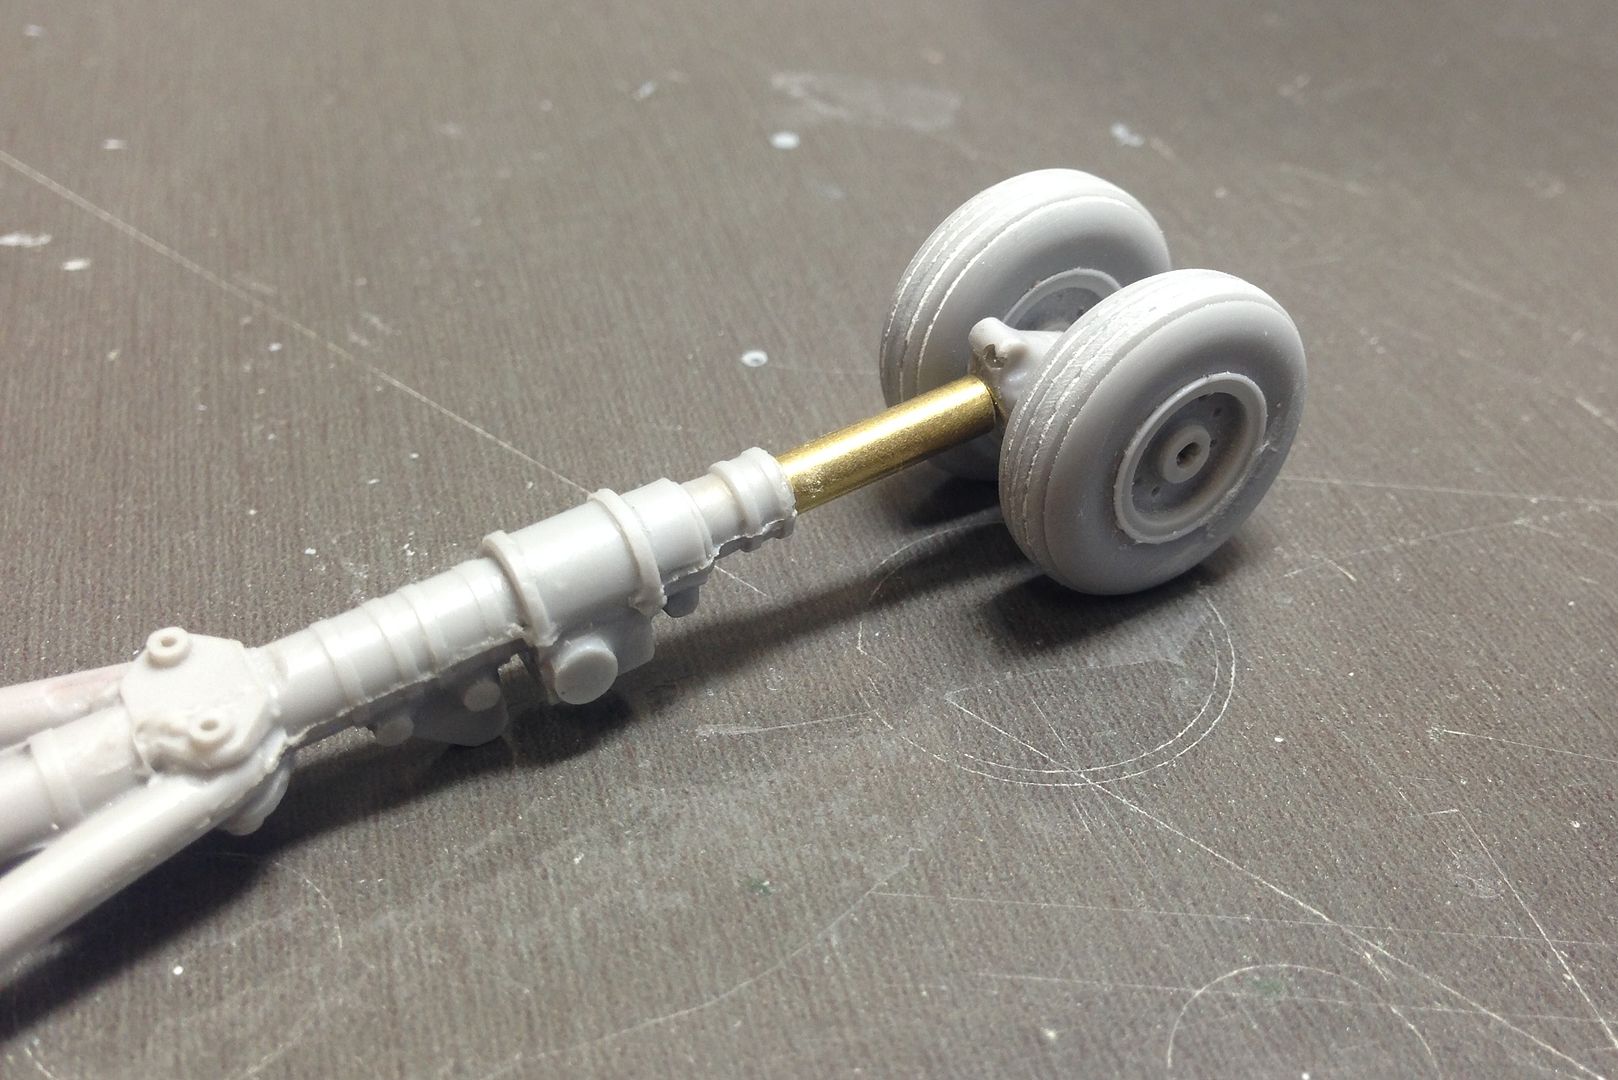
A quick mock up of what I am aiming for.
I have painted the insides of the intakes using my tried and tested Tamiya fine surface primer under 3 coats of Mr Surfacer White 1000 shot through my iwata airbrush followed by a coat of tamiya clear. I have then polished the surface with tamiya polishing compound buffed with a cloth polishing wheel in a cordless Dremel.

You can see the difference the polishing makes with the shine on the intake on the right.

I am still on the fence as to how I want to depict the finished model, whether in flight, parked or at the point of takeoff. I reckon it will look cool at the point of just before lift off and am hoping to achieve that look. There are a number of challenges to overcome however, and this is one of them.
The undercarriage has been designed with the model parked, so the nose gear oleo will need to be extended if it is to be represented as per the above. The kit gear has brass tube embedded into the resin parts for strength.

I cut the oleo from the nose gear leg and immediately ran into a problem where the tube that is in the leg is offset towards the front, so it wasn't going to be as easy as sliding in some new metal and building up from there.
I was able to drill in some smaller diameter rod and then extend the oleo 4mm which I reckon will look about right for a nose gear that has no weight on it.


A quick mock up of what I am aiming for.

- Ericg
- Posts: 214
- Joined: Mon Apr 14, 2014 7:30 pm
Re: 1/48th scale HPH Concorde
![]() by Adam the Akrodude » Sun Sep 27, 2015 9:43 am
by Adam the Akrodude » Sun Sep 27, 2015 9:43 am
Hey Eric
How will you position the mains? It's going to be fascinating to see what you do to position this big bird as it rotates into the burning blue! How about some LED's to show the engines in full reheat?


How will you position the mains? It's going to be fascinating to see what you do to position this big bird as it rotates into the burning blue! How about some LED's to show the engines in full reheat?
- Adam the Akrodude
- Posts: 2819
- Joined: Mon Apr 14, 2014 1:02 pm
- Location: 100,124,672,897 Bifrost Rd, Valhalla, Asgard
Re: 1/48th scale HPH Concorde
![]() by Ericg » Sun Sep 27, 2015 10:40 am
by Ericg » Sun Sep 27, 2015 10:40 am
Hi Adam,
Thanks mate, I am looking for a suitable lighting system to position 4 lights in the exhausts to represent the reheat. That will come a bit later.
The mains will be as per your first pic.
Eric.
Thanks mate, I am looking for a suitable lighting system to position 4 lights in the exhausts to represent the reheat. That will come a bit later.
The mains will be as per your first pic.
Eric.
- Ericg
- Posts: 214
- Joined: Mon Apr 14, 2014 7:30 pm
Re: 1/48th scale HPH Concorde
![]() by tor lives » Sun Sep 27, 2015 10:52 am
by tor lives » Sun Sep 27, 2015 10:52 am
Ericg wrote: I am looking for a suitable lighting system to position 4 lights in the exhausts to represent the reheat. That will come a bit later.
Eric.
G'day mate,
While I think I am already too far into the build of my current 1:100 prototype Concorde to now consider a "reheat" lighting option for it's big Olympus engines, I would like to do this with a 1:144th, (or maybe 1:72), Concorde down the track.
I will therefore be most interested in the technicalities of how you tackle this Eric, especially if your chosen technique is adaptable to smaller scales.
TOR
PS: Some great shots there Adam....but is there any such thing as a bad photo of a Concorde, (I think not
- tor lives
- Posts: 4306
- Joined: Mon Apr 14, 2014 11:01 am
Re: 1/48th scale HPH Concorde
![]() by Ericg » Sun Sep 27, 2015 9:02 pm
by Ericg » Sun Sep 27, 2015 9:02 pm
Adam,
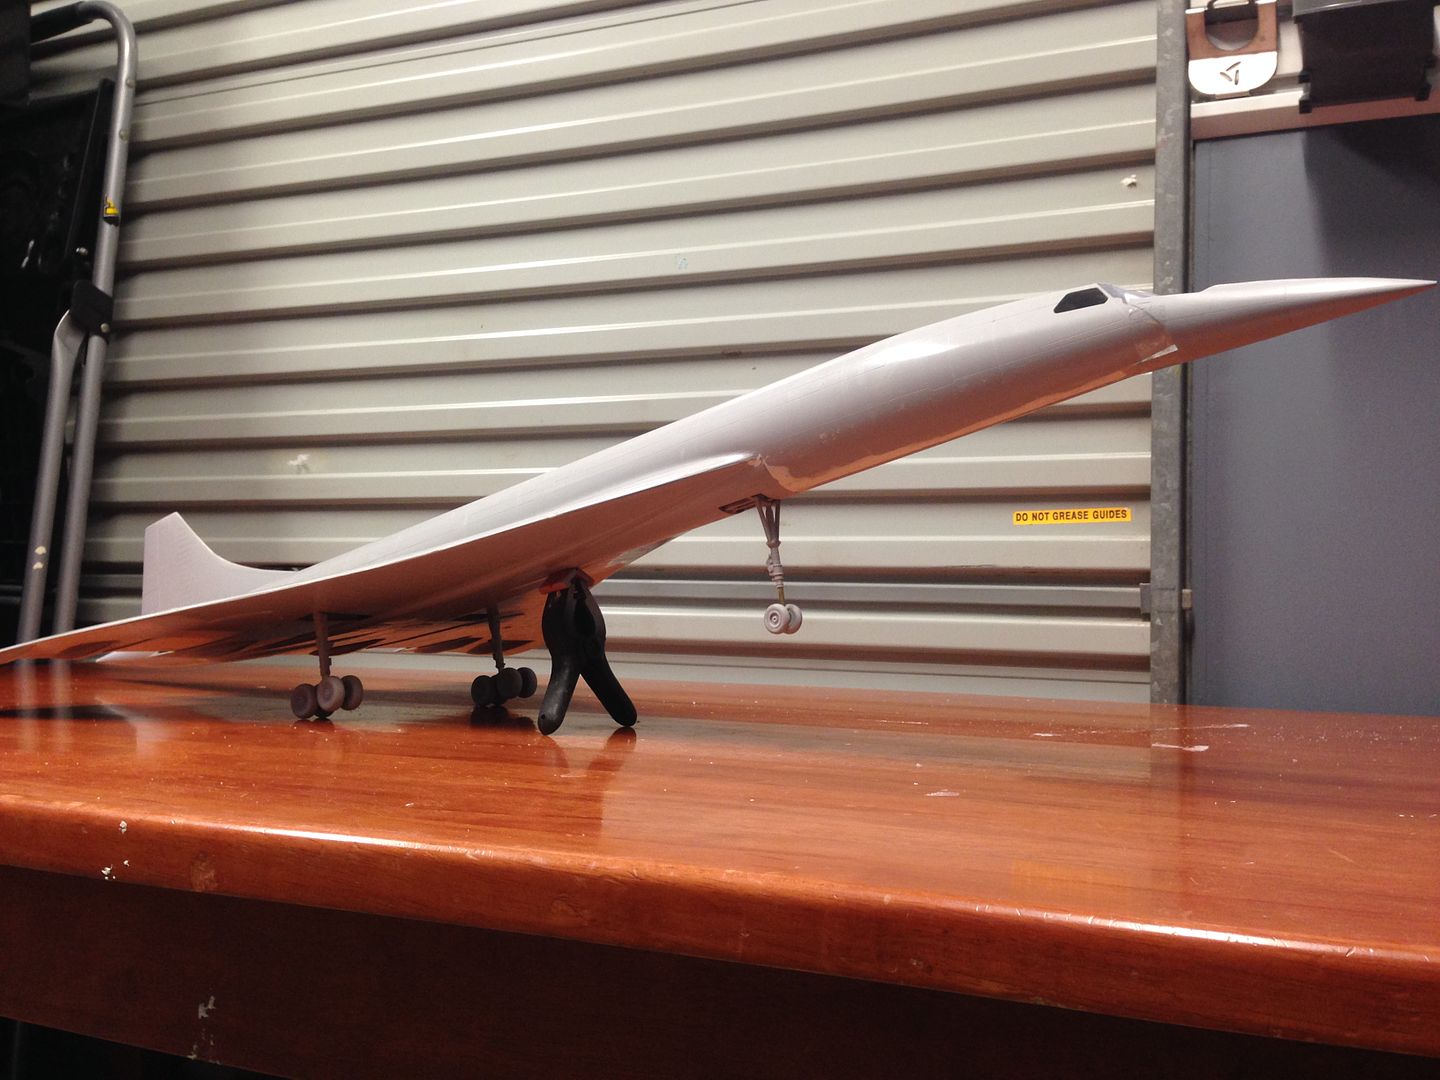
That first photo inspired me to get the model onto its wheels just so that I could try and re-create it. See the bottom photo on the following update.
Another challenge with the kit is getting the main wheel bays into the fuselage. Having conquered the challenge of getting the fiberglass gear doors cut out of the fuselage in a neat and orderly fashion, the modeler is now faced with shoehorning the resin wheel bays, unassembled, into the resulting holes (that they don't fit through)and then re-assembling them through the open hole. Have I told you guys how much I am enjoying this project yet????
Here is the wheel bay, dry fitted together. The instructions call for foam to be fitted into the wheel bays so that there is something to push back and hold it against the inside skins whilst the glue dries. Lovely idea in theory. As can be seen in the picture, there is some grinding that I have done to the roof area of where the wheel bay will sit. The reason for this is that the bay will not fit in otherwise, so throw the foam idea out of the window! (it does however work quite nicely for the nose gear bay).
Note: to get the large part of the wheel bay through the hole, some of the corners of the part need to be taken off for it to fit inside.
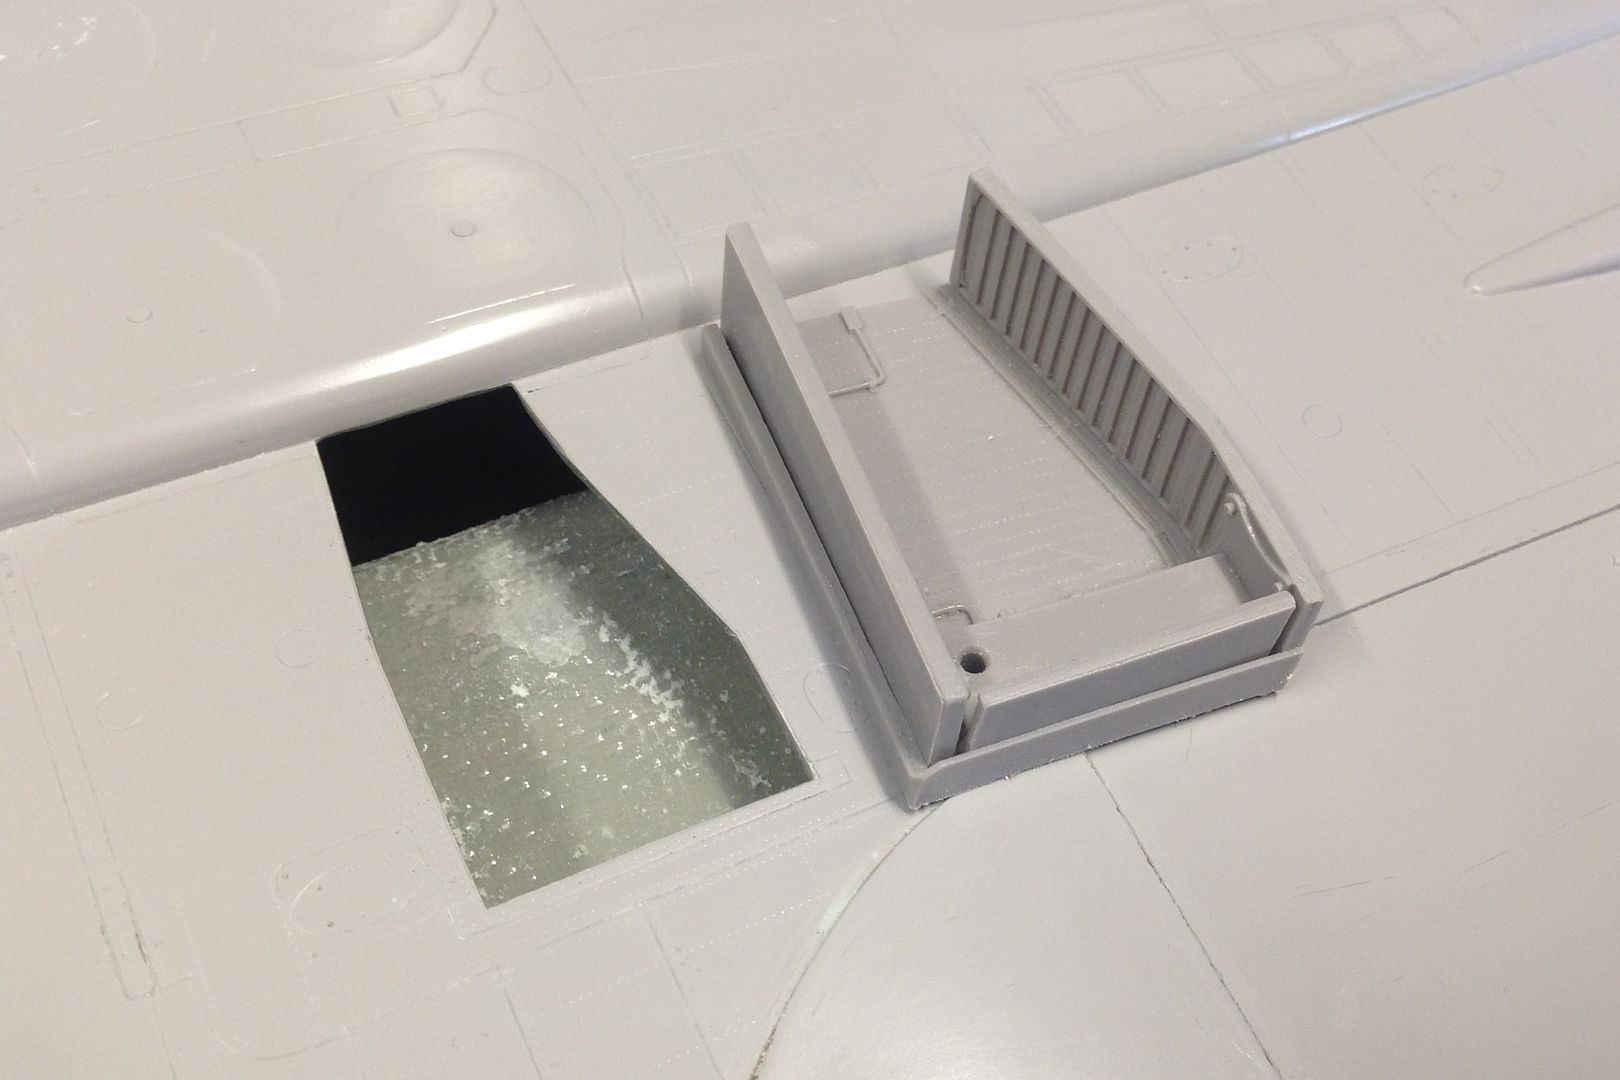
Here can be seen the wall of the wheel bay and how much it needs to be sunk into the hole (no roam for foam here!)
Once the bay fits, it is a simple matter of sliding it around and then positioning it so that the walls can be glued into place followed by moving it around so that 30 minute epoxy can be applied to the inside of the wing and then allowed to set. Its important not to mess this part up as there really isn't any turning back!

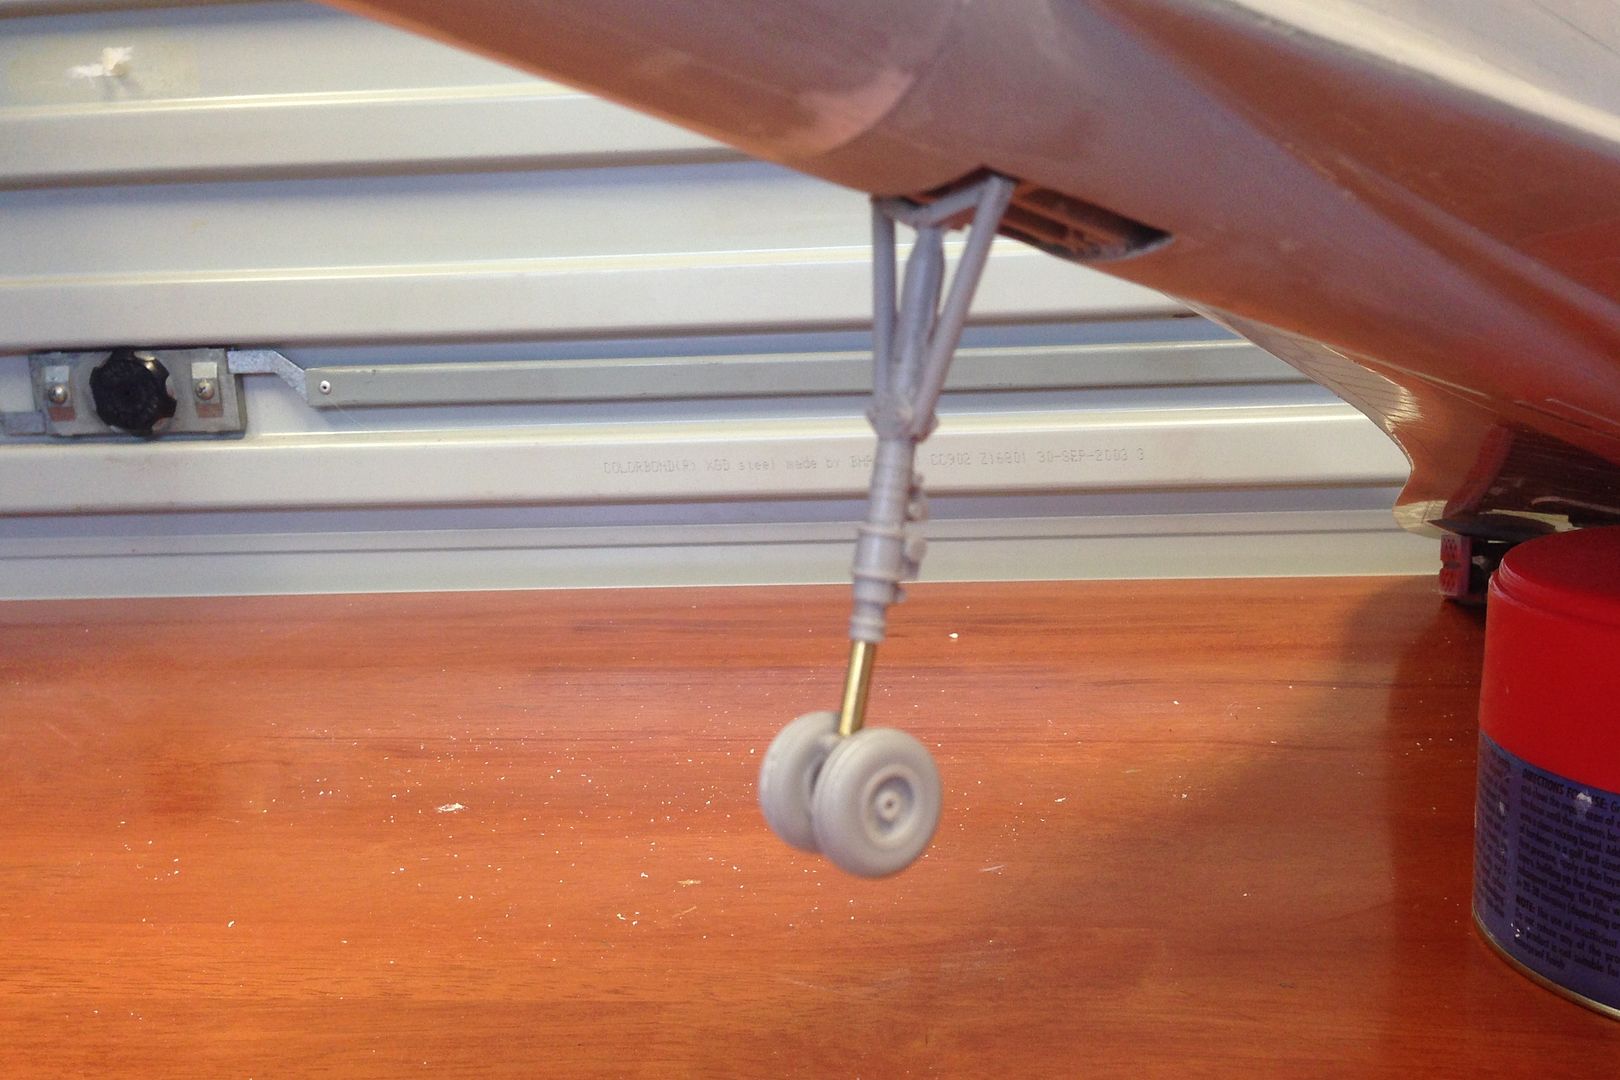
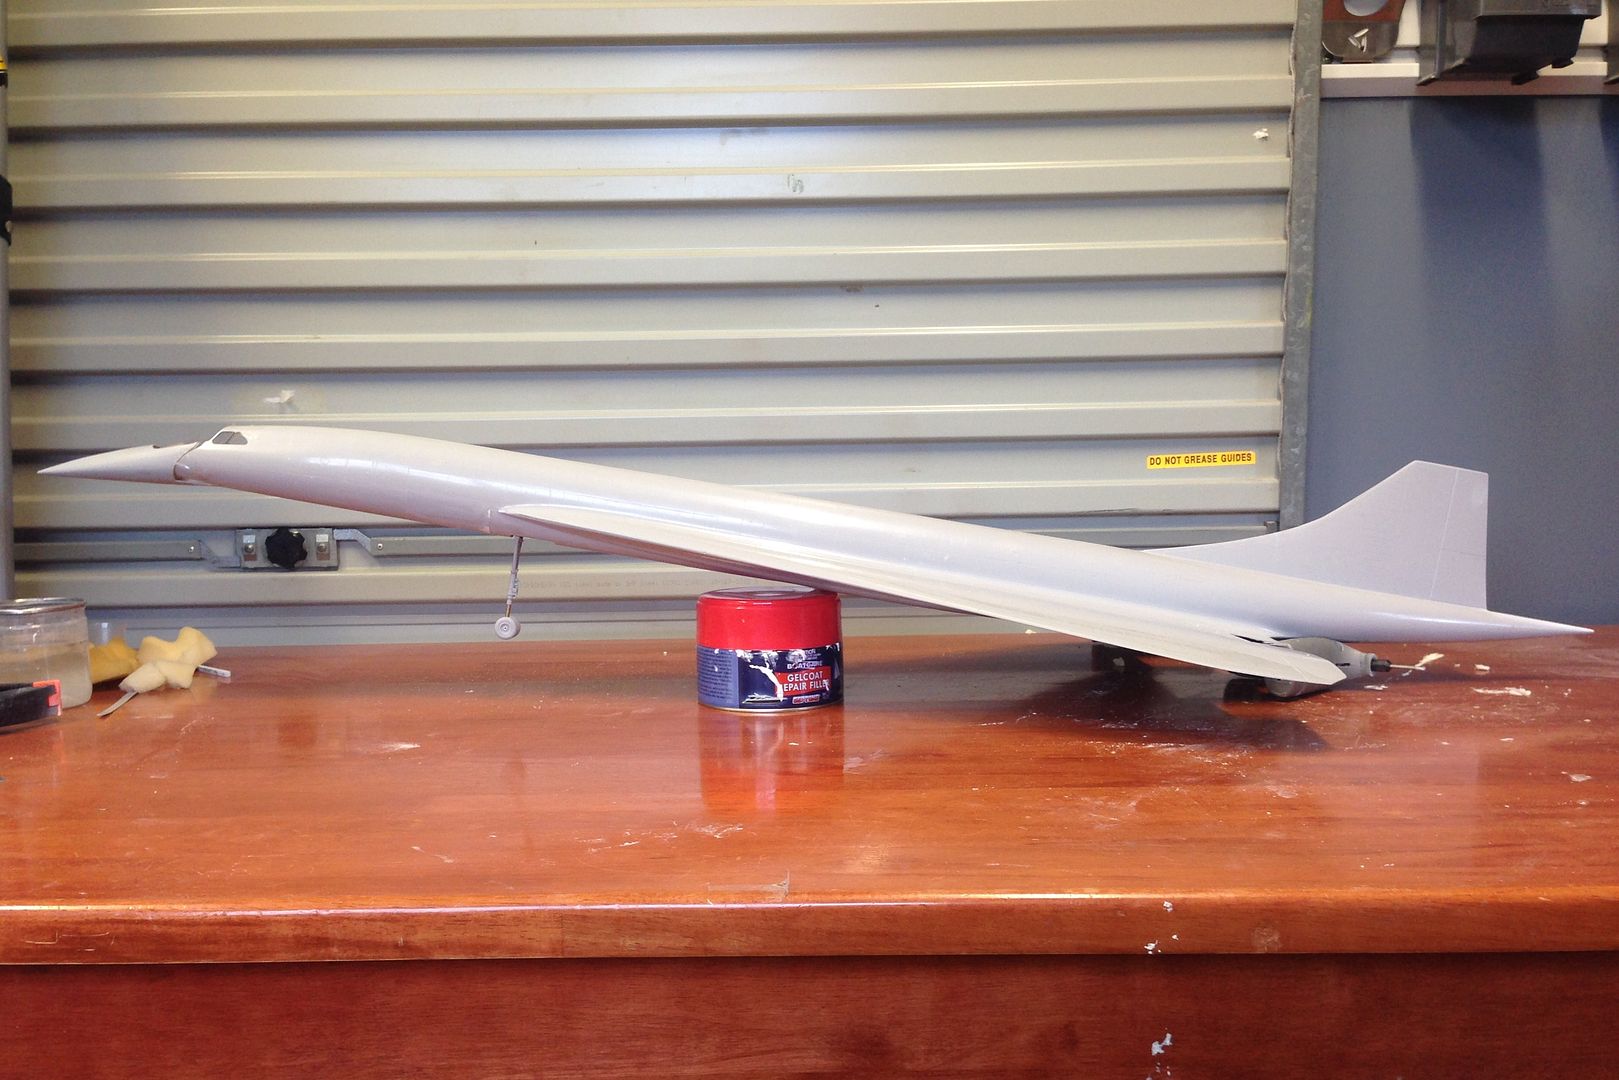
The upside to getting the bays in is that the model now sits on its undercarriage and it looks quite the beast. In the following two pics you can see the effect that extending the nose oleo has had on the sit of the model.
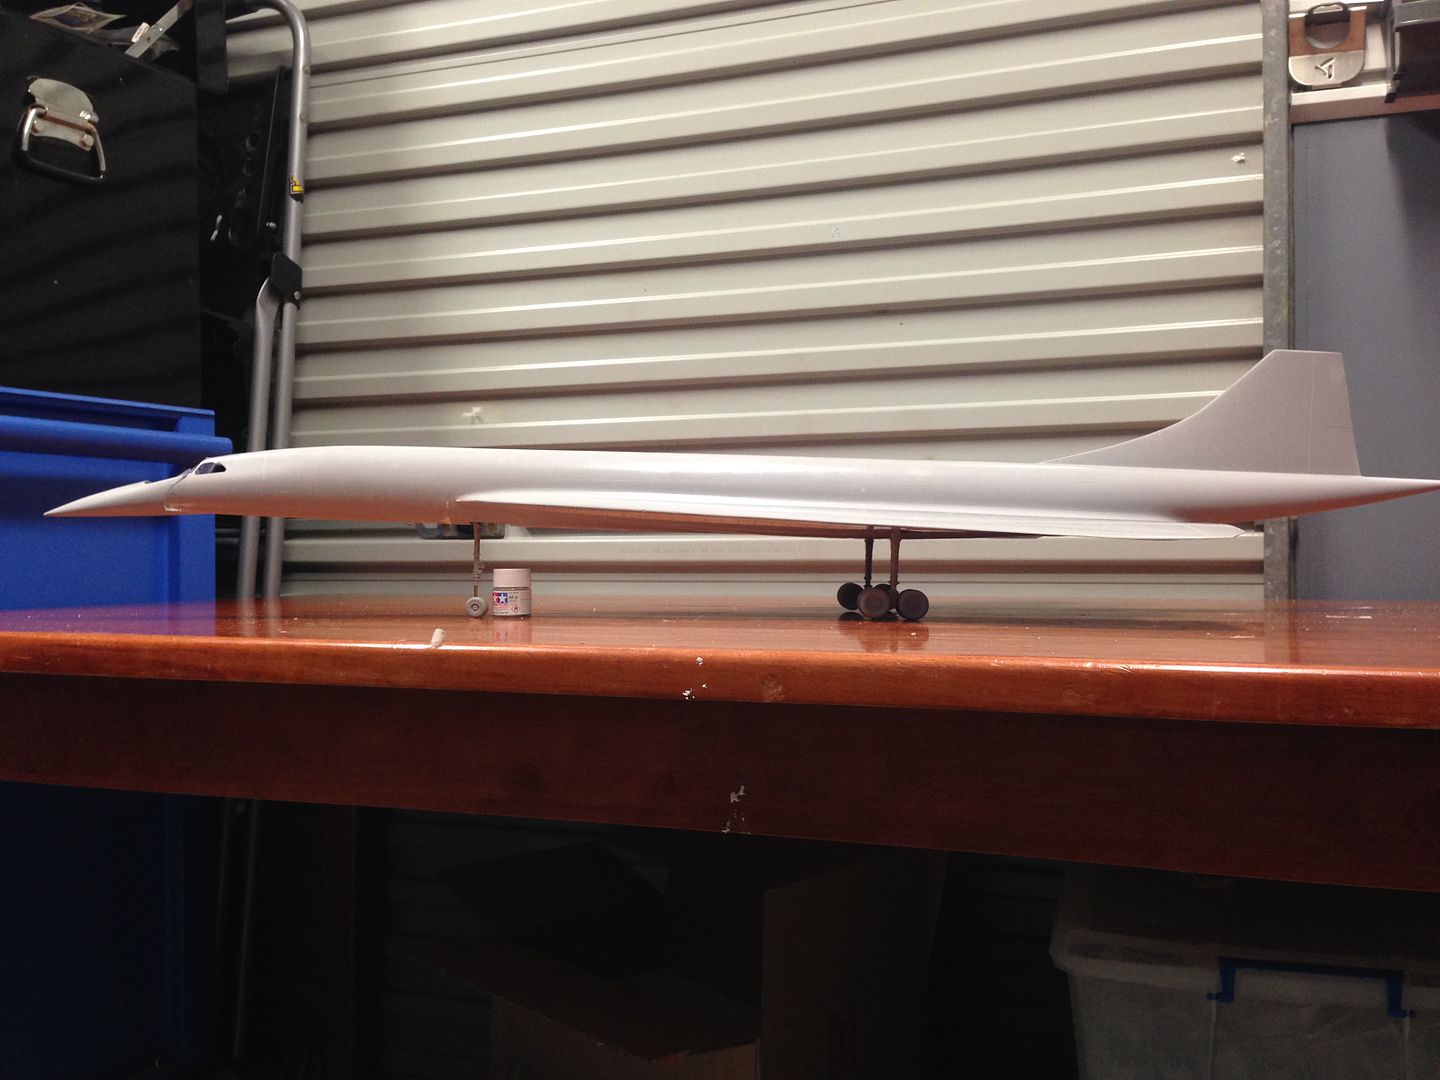
Now I can play around with refining the way the model sits..... still undecided... HELP!
That first photo inspired me to get the model onto its wheels just so that I could try and re-create it. See the bottom photo on the following update.
Another challenge with the kit is getting the main wheel bays into the fuselage. Having conquered the challenge of getting the fiberglass gear doors cut out of the fuselage in a neat and orderly fashion, the modeler is now faced with shoehorning the resin wheel bays, unassembled, into the resulting holes (that they don't fit through)and then re-assembling them through the open hole. Have I told you guys how much I am enjoying this project yet????
Here is the wheel bay, dry fitted together. The instructions call for foam to be fitted into the wheel bays so that there is something to push back and hold it against the inside skins whilst the glue dries. Lovely idea in theory. As can be seen in the picture, there is some grinding that I have done to the roof area of where the wheel bay will sit. The reason for this is that the bay will not fit in otherwise, so throw the foam idea out of the window! (it does however work quite nicely for the nose gear bay).
Note: to get the large part of the wheel bay through the hole, some of the corners of the part need to be taken off for it to fit inside.

Here can be seen the wall of the wheel bay and how much it needs to be sunk into the hole (no roam for foam here!)

Once the bay fits, it is a simple matter of sliding it around and then positioning it so that the walls can be glued into place followed by moving it around so that 30 minute epoxy can be applied to the inside of the wing and then allowed to set. Its important not to mess this part up as there really isn't any turning back!

The upside to getting the bays in is that the model now sits on its undercarriage and it looks quite the beast. In the following two pics you can see the effect that extending the nose oleo has had on the sit of the model.


Now I can play around with refining the way the model sits..... still undecided... HELP!

- Ericg
- Posts: 214
- Joined: Mon Apr 14, 2014 7:30 pm
Re: 1/48th scale HPH Concorde
![]() by Ericg » Sun Sep 27, 2015 9:58 pm
by Ericg » Sun Sep 27, 2015 9:58 pm
One more update before bed.
I was not quite happy with the nose gear. Hph have managed to incorporate metal rods into the resin castings which is great for strength. The struts on each side of the nose gear are round, and Hph will have you modifying each one to attach the square section onto. This is sort of OK, but I decided to go one step further.
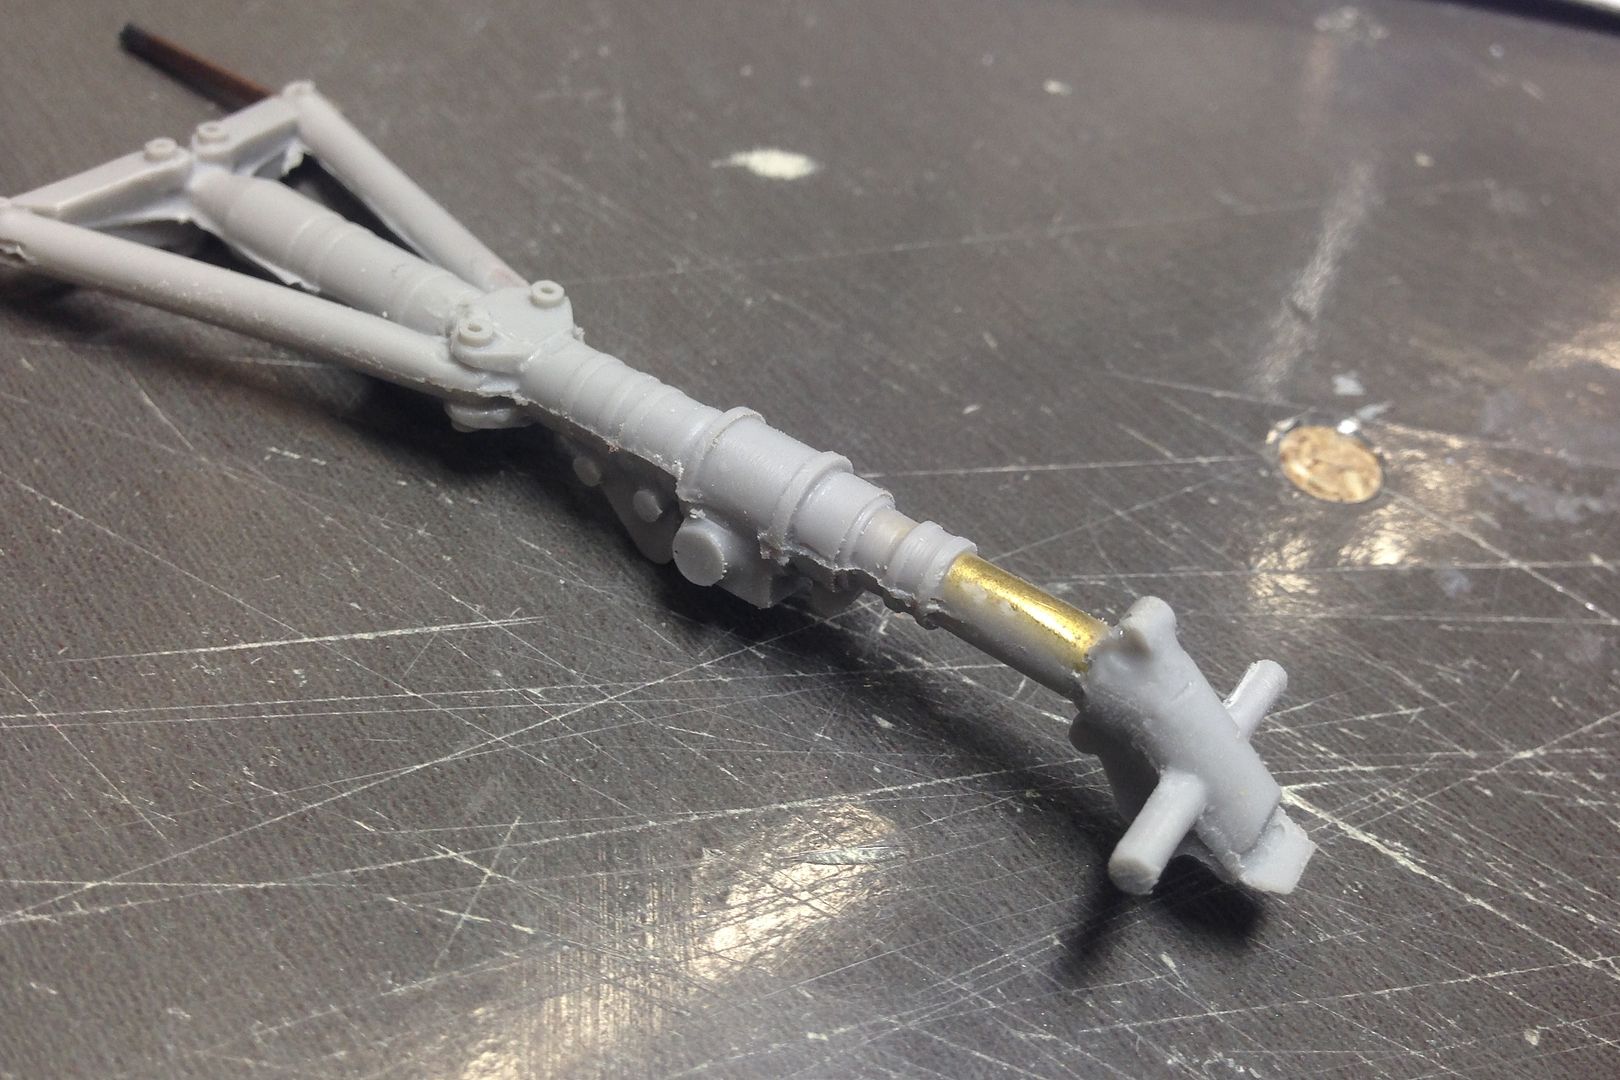
Here is the nose gear leg. I have already modified the left side strut. As can be seen the right side is still round.
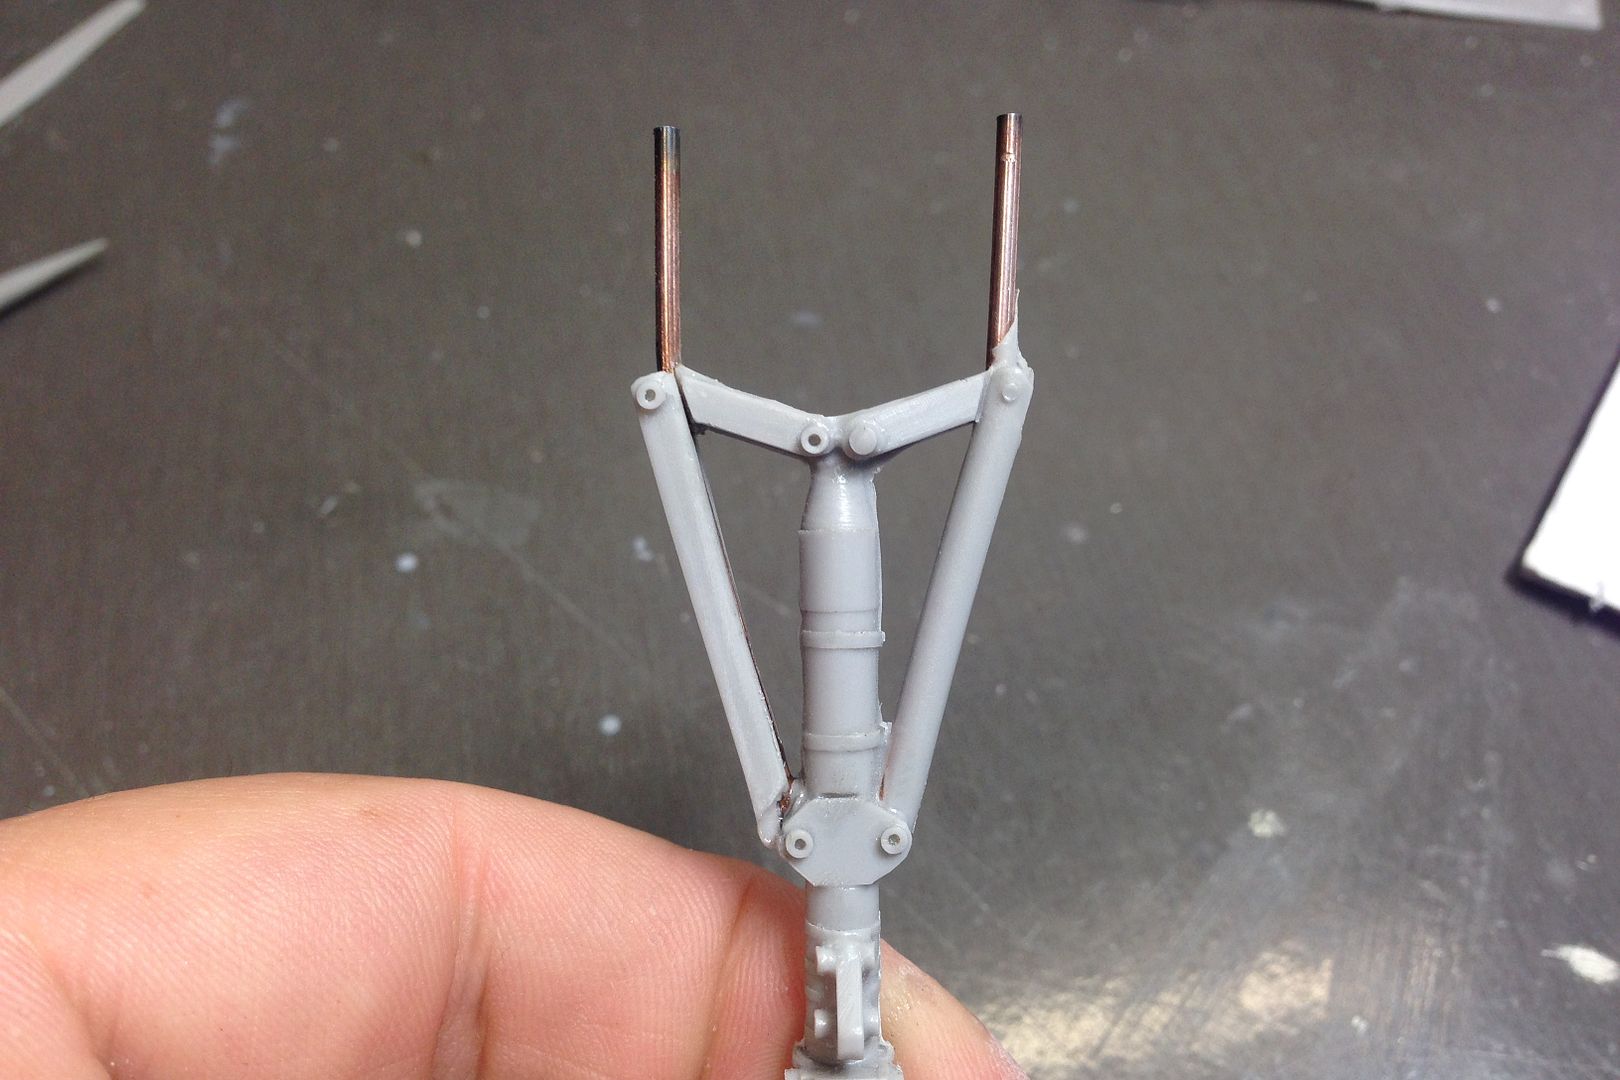
The instructions call for the strut to be flattened on the outer side as per the following pic, with the replacement strut being thinned down and glued to it ( I haven't thinned this one down for obvious reasons)I reckoned that with a bit of a risky move, I could do it just a bit better.
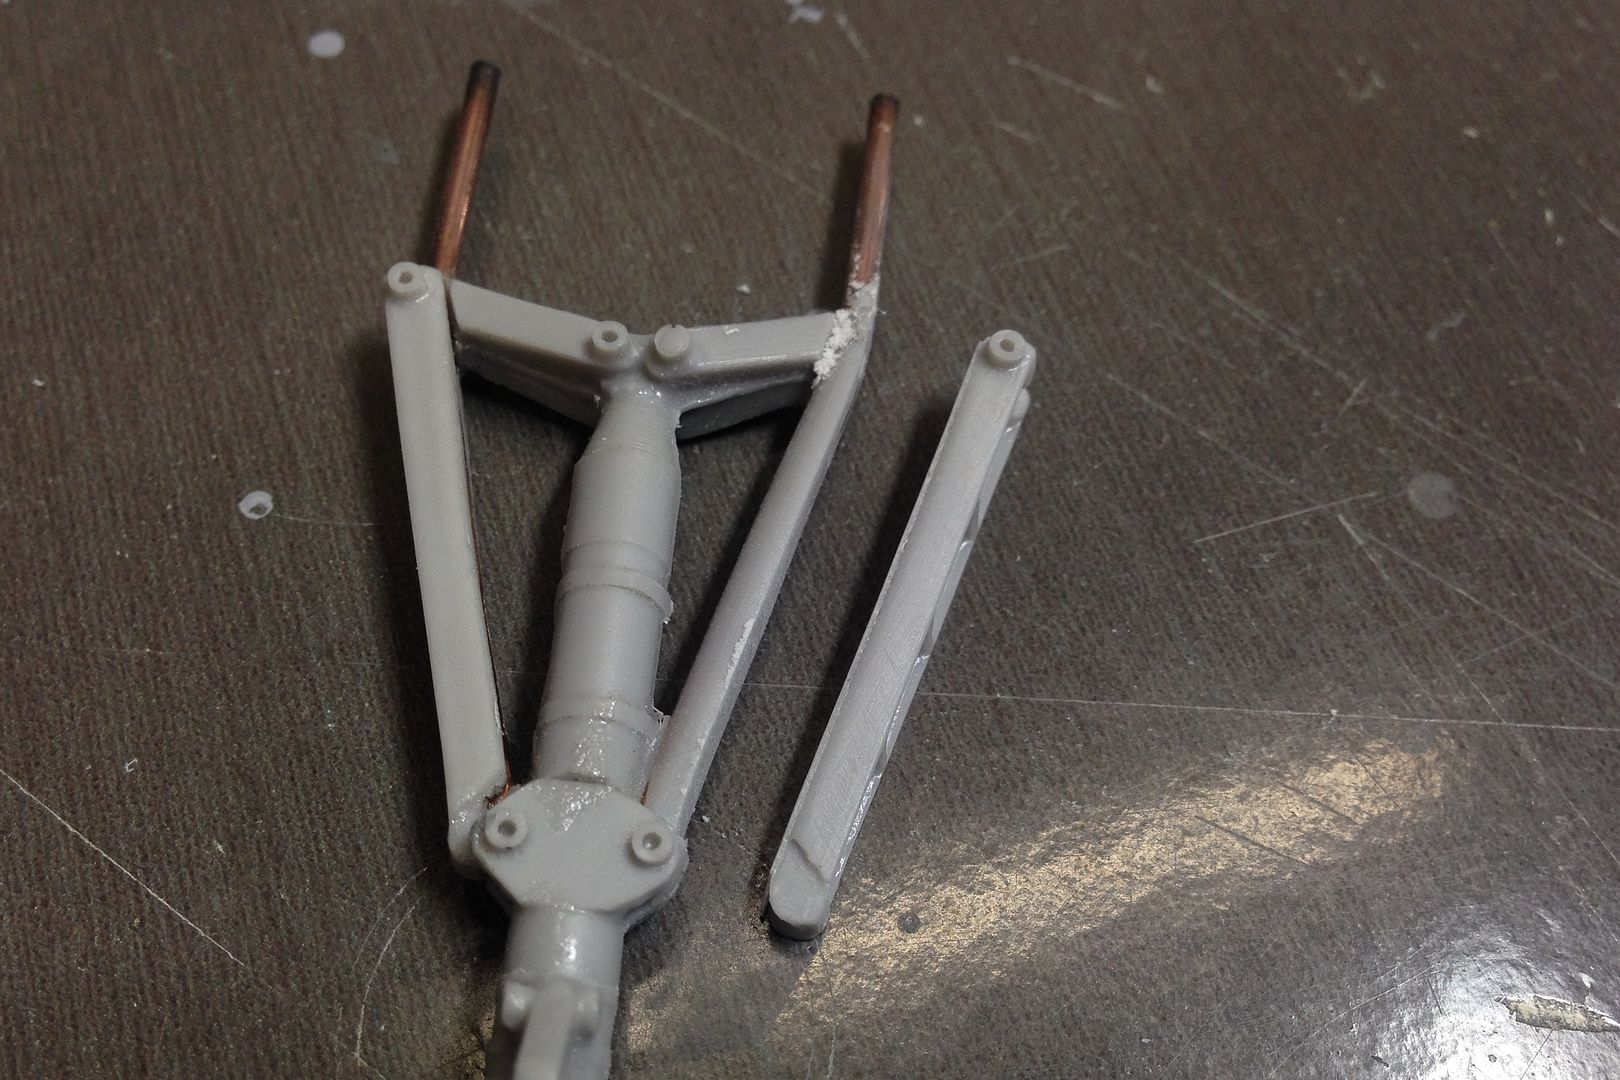
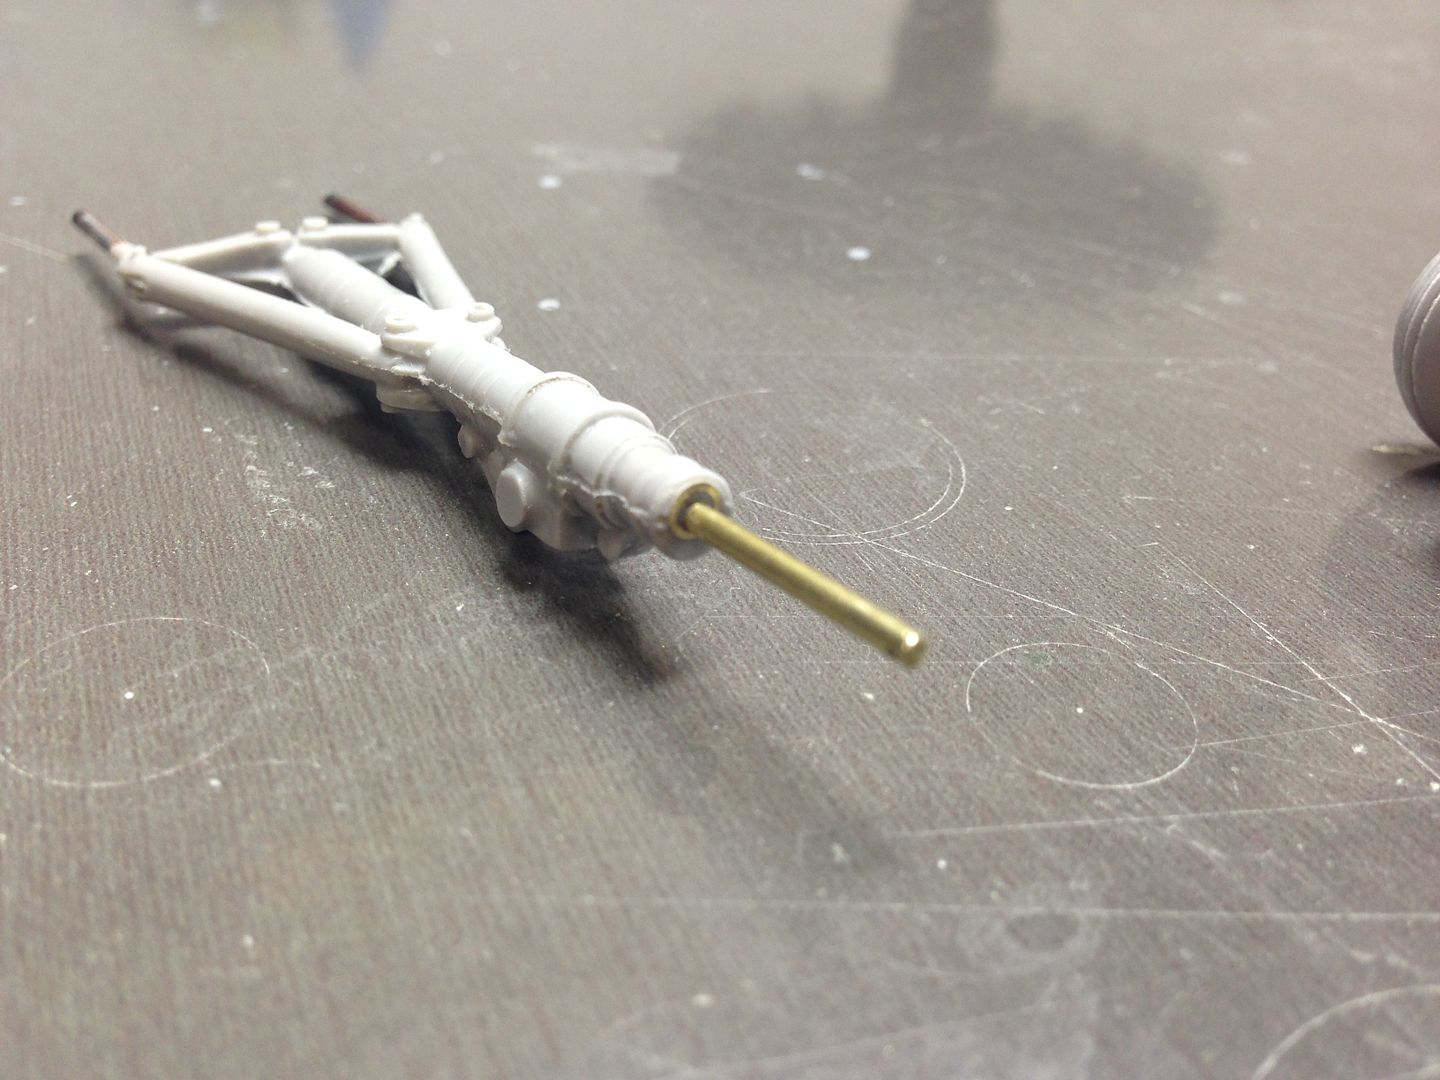
I completely stripped the resin from the strut, and cut a deep trench into the replacement strut. I also ground off half the thickness of the metal rod.
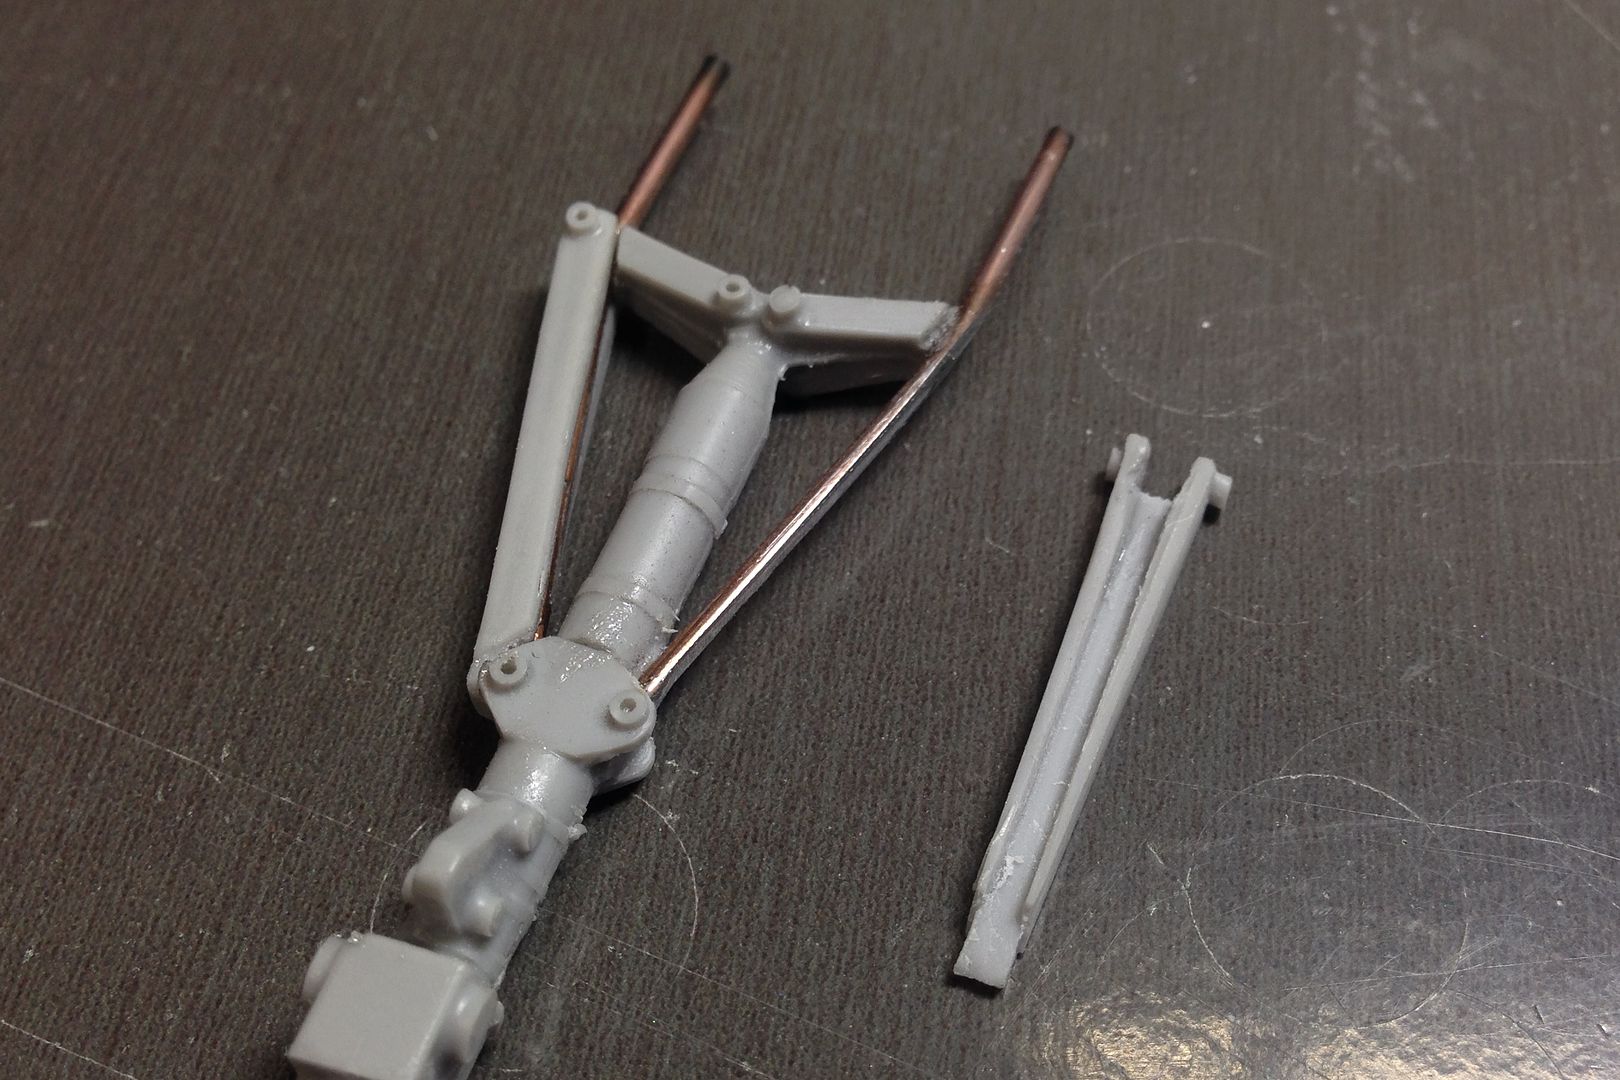
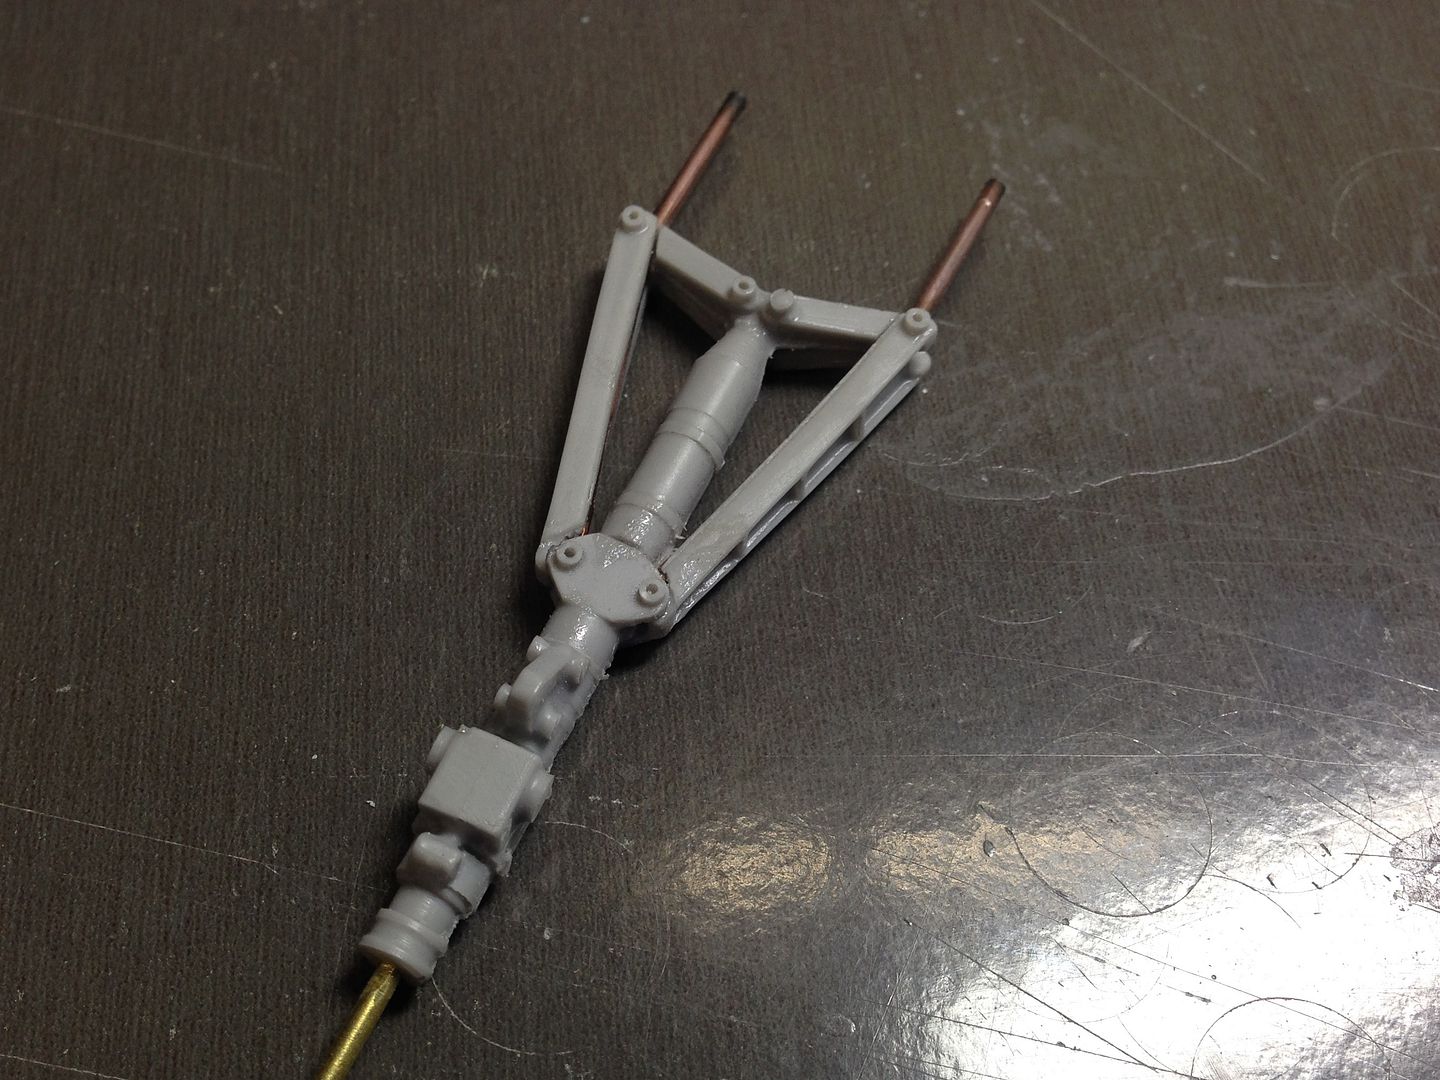
The completed unit. It looks alot better than the way it should have been done according to the instructions.
I was not quite happy with the nose gear. Hph have managed to incorporate metal rods into the resin castings which is great for strength. The struts on each side of the nose gear are round, and Hph will have you modifying each one to attach the square section onto. This is sort of OK, but I decided to go one step further.
Here is the nose gear leg. I have already modified the left side strut. As can be seen the right side is still round.

The instructions call for the strut to be flattened on the outer side as per the following pic, with the replacement strut being thinned down and glued to it ( I haven't thinned this one down for obvious reasons)I reckoned that with a bit of a risky move, I could do it just a bit better.

I completely stripped the resin from the strut, and cut a deep trench into the replacement strut. I also ground off half the thickness of the metal rod.

The completed unit. It looks alot better than the way it should have been done according to the instructions.

- Ericg
- Posts: 214
- Joined: Mon Apr 14, 2014 7:30 pm
Re: 1/48th scale HPH Concorde
![]() by Ericg » Mon Sep 28, 2015 9:46 pm
by Ericg » Mon Sep 28, 2015 9:46 pm
Not much of an update today, as I spent a bit of time chasing down the lighting system that will hopefully depict the 4 exhausts in reheat. Have a solution on its way to me via the post.
I also spent some time looking through a section of the hobby shop that I am not very familiar with at all, being any other area that isn't 1/32 scale to try and track down a suitable solution to my desire to have a full compliment of flight crew in this model. Unfortunately my search online for `1/48 British Airways pilots and flight engineers figures' provided 0 results, so it was up to me to make it happen.
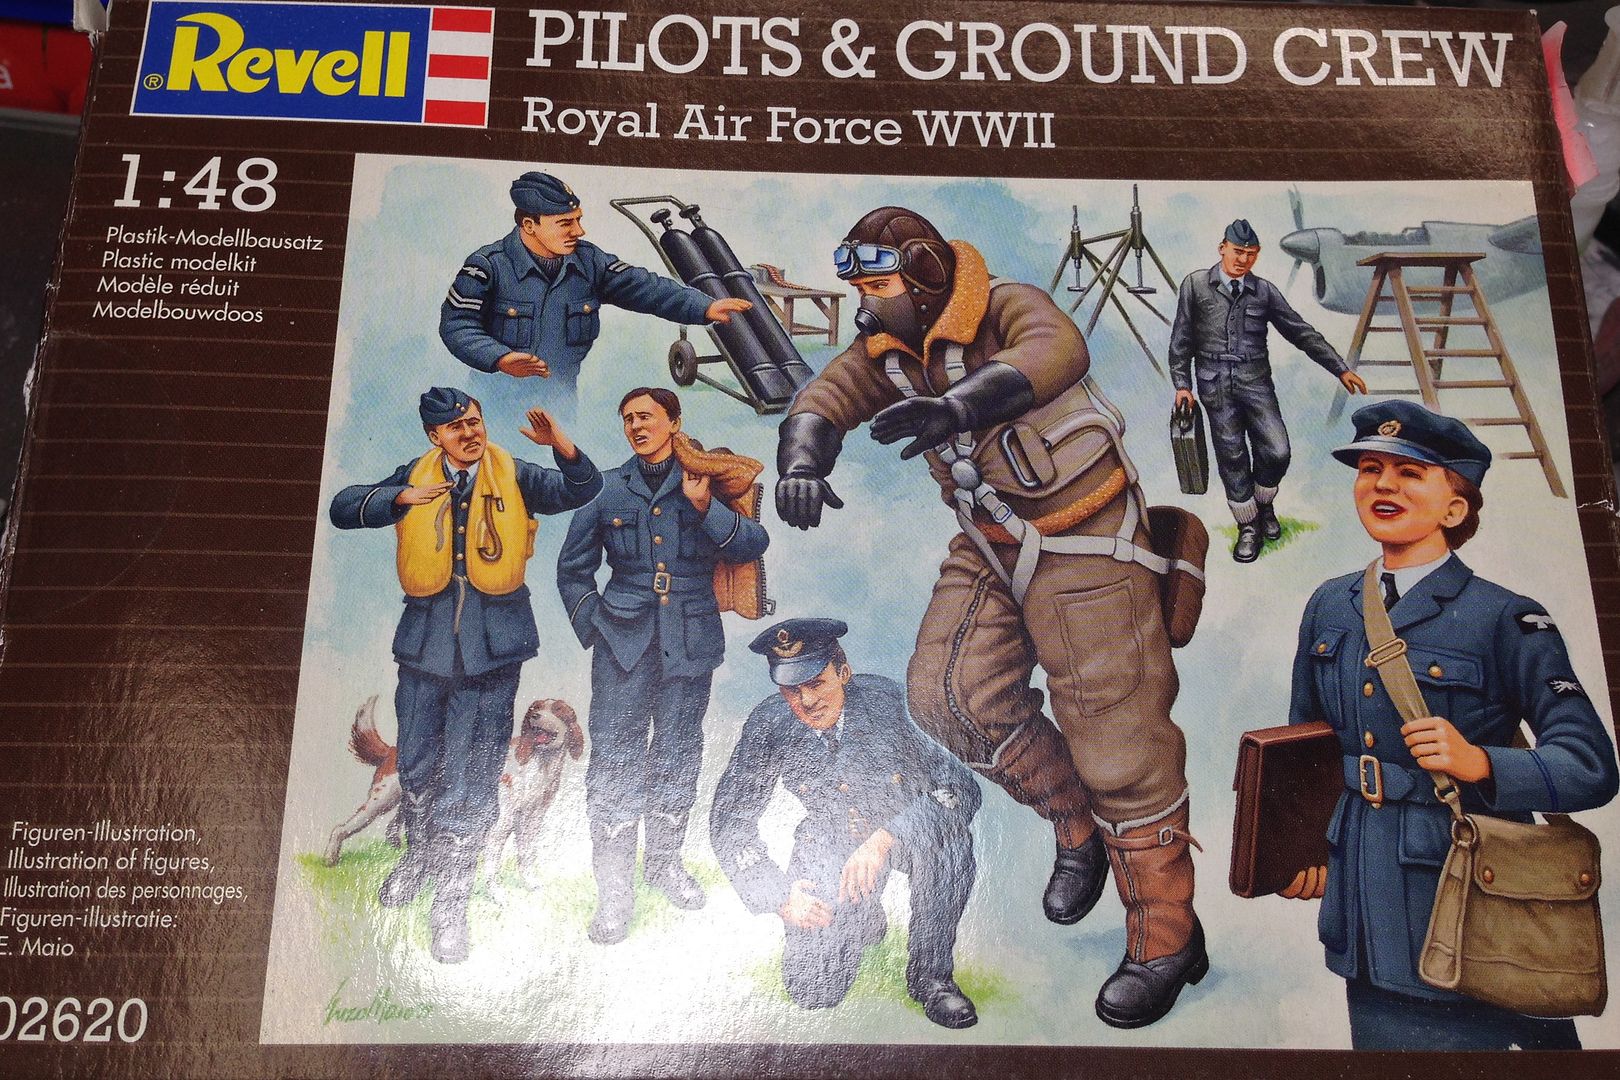
I found this Revell kit. It had a few items that I reckon could be of use like trousers, dress shoes, heads and hopefully some other stuff I could adapt. I have never modeled figure before so this was always going to be a learning curve.
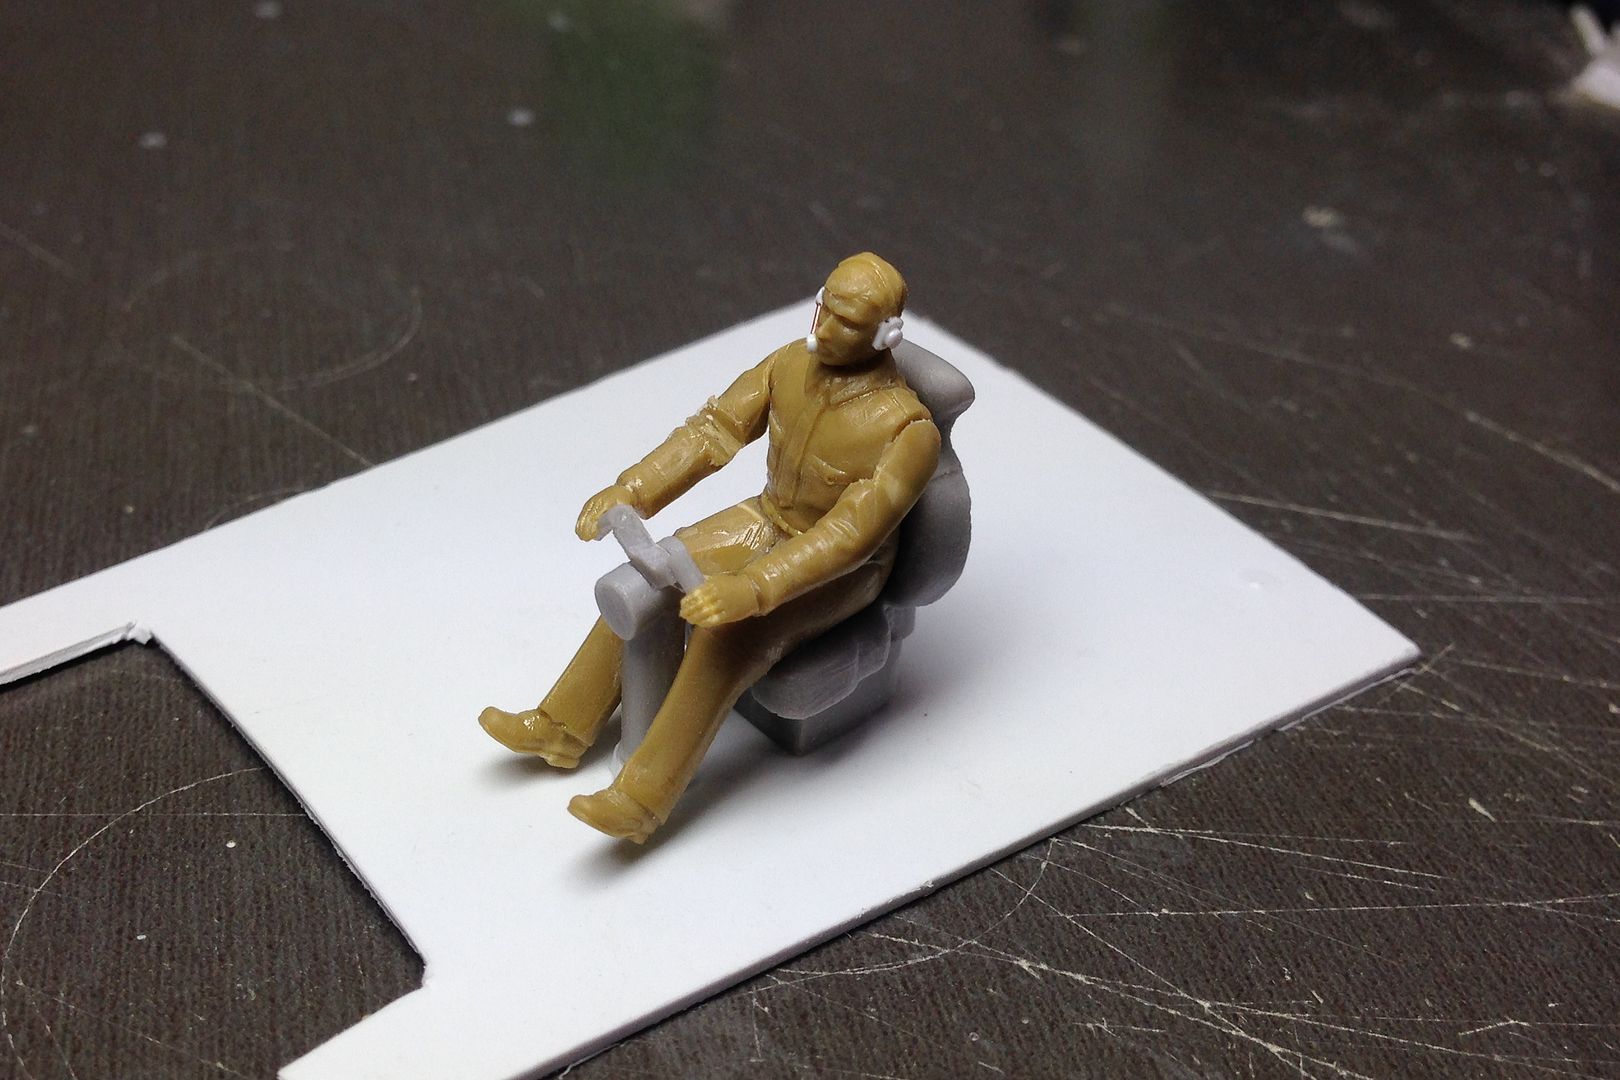
Using a new No.11 blade, I was able to carve out a tie, epaulettes, pockets and belt on the torso/chest and also modify the head to depict the headset headband. I then fitted the microphone and ear cups from plastic card. I then modified some legs and arms to fit the captains position. I will cast copies of the body so that I can use it on the other three crew positions and then adapt other arms to suit once I can identify where each crew member would have had their hands at the point of rotation, To add some difficulty I will also give a couple of the crew members short sleeved shirts.
Here is a mock up of the Captain. I have to do a bit of filling on the gaps in the arms and elbow where each part has been cut to reposition it.
I also spent some time looking through a section of the hobby shop that I am not very familiar with at all, being any other area that isn't 1/32 scale to try and track down a suitable solution to my desire to have a full compliment of flight crew in this model. Unfortunately my search online for `1/48 British Airways pilots and flight engineers figures' provided 0 results, so it was up to me to make it happen.
I found this Revell kit. It had a few items that I reckon could be of use like trousers, dress shoes, heads and hopefully some other stuff I could adapt. I have never modeled figure before so this was always going to be a learning curve.

Using a new No.11 blade, I was able to carve out a tie, epaulettes, pockets and belt on the torso/chest and also modify the head to depict the headset headband. I then fitted the microphone and ear cups from plastic card. I then modified some legs and arms to fit the captains position. I will cast copies of the body so that I can use it on the other three crew positions and then adapt other arms to suit once I can identify where each crew member would have had their hands at the point of rotation, To add some difficulty I will also give a couple of the crew members short sleeved shirts.
Here is a mock up of the Captain. I have to do a bit of filling on the gaps in the arms and elbow where each part has been cut to reposition it.


- Ericg
- Posts: 214
- Joined: Mon Apr 14, 2014 7:30 pm
Re: 1/48th scale HPH Concorde
![]() by Adam the Akrodude » Tue Sep 29, 2015 10:57 am
by Adam the Akrodude » Tue Sep 29, 2015 10:57 am
Your Concorde driver is looking cool! I find it fun playing "Frankenstein" with figures - chopping, hacking, carving, bogging to get the right posture/pose.
Probably of not much use, but I've been thinking what and how you can pose your Concorde as it zooms into the blue. Much like Ray S has done with his cute little Gnat, perhaps using machined down clear rod coming out of the exhausts could be used to prop up the nose? These could be machined into a conical shape. If they were lightly sanded or painted as Ray did, when the LED's light up, this light will help make these "cones" light up. If they are polished clear, the light will have nothing to bounce off. May be a stupid idea, but might work? You could even segment the cone into pieces, with each segment having a "cone" in between. This cone could be lightly sanded so the light hits it looking like a shock diamond. Less light will reach each "shock diamond" as the light travels further down the cone - now how is that for a crackpot idea! You've a lathe, so it would not be hard to try my nutso ideas - what do you reckon?
Probably of not much use, but I've been thinking what and how you can pose your Concorde as it zooms into the blue. Much like Ray S has done with his cute little Gnat, perhaps using machined down clear rod coming out of the exhausts could be used to prop up the nose? These could be machined into a conical shape. If they were lightly sanded or painted as Ray did, when the LED's light up, this light will help make these "cones" light up. If they are polished clear, the light will have nothing to bounce off. May be a stupid idea, but might work? You could even segment the cone into pieces, with each segment having a "cone" in between. This cone could be lightly sanded so the light hits it looking like a shock diamond. Less light will reach each "shock diamond" as the light travels further down the cone - now how is that for a crackpot idea! You've a lathe, so it would not be hard to try my nutso ideas - what do you reckon?
- Adam the Akrodude
- Posts: 2819
- Joined: Mon Apr 14, 2014 1:02 pm
- Location: 100,124,672,897 Bifrost Rd, Valhalla, Asgard
Re: 1/48th scale HPH Concorde
![]() by Ericg » Tue Sep 29, 2015 9:33 pm
by Ericg » Tue Sep 29, 2015 9:33 pm
Dunno Adam.... maybe a little complicated to set it up like that? I am yet to see any shots of the Concorde in reheat with shock diamonds.
Moving on with the flight crew. I needed to start making copies of the parts that I have modified to make my job of filling the cockpit with crew figures a bit easier.
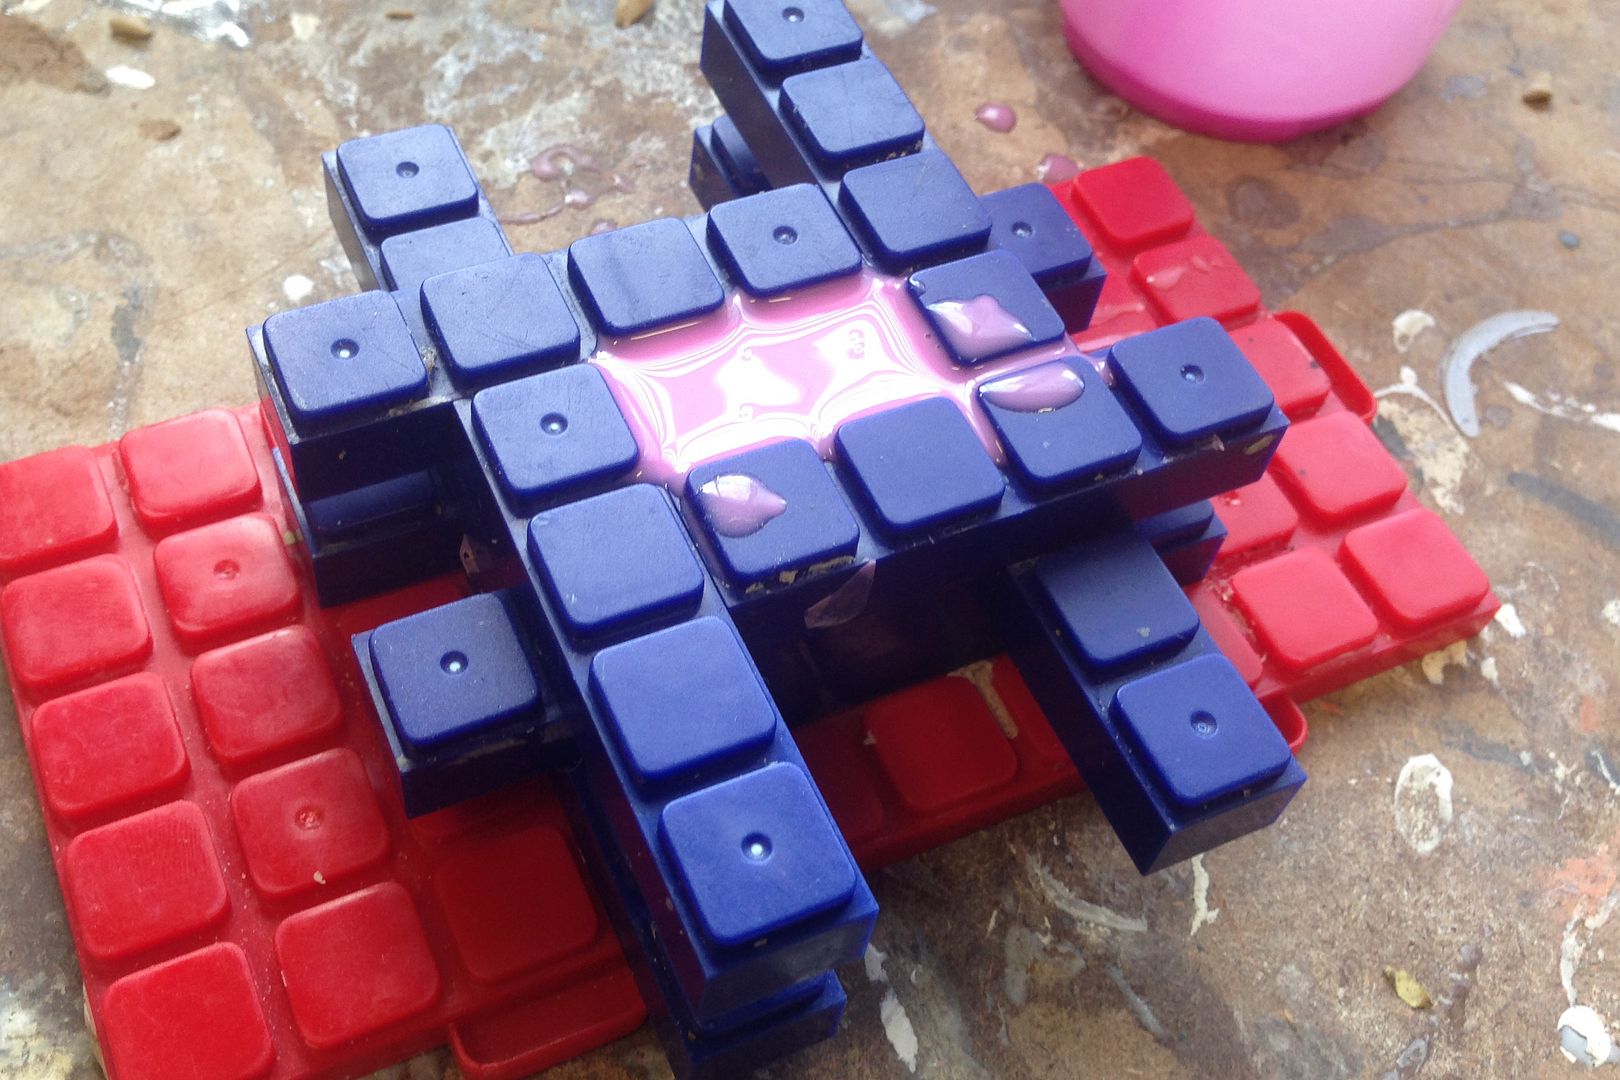
I made a small plinth from Modelers clay.
Boxed it in with the Gunze Sangyo casting block set.
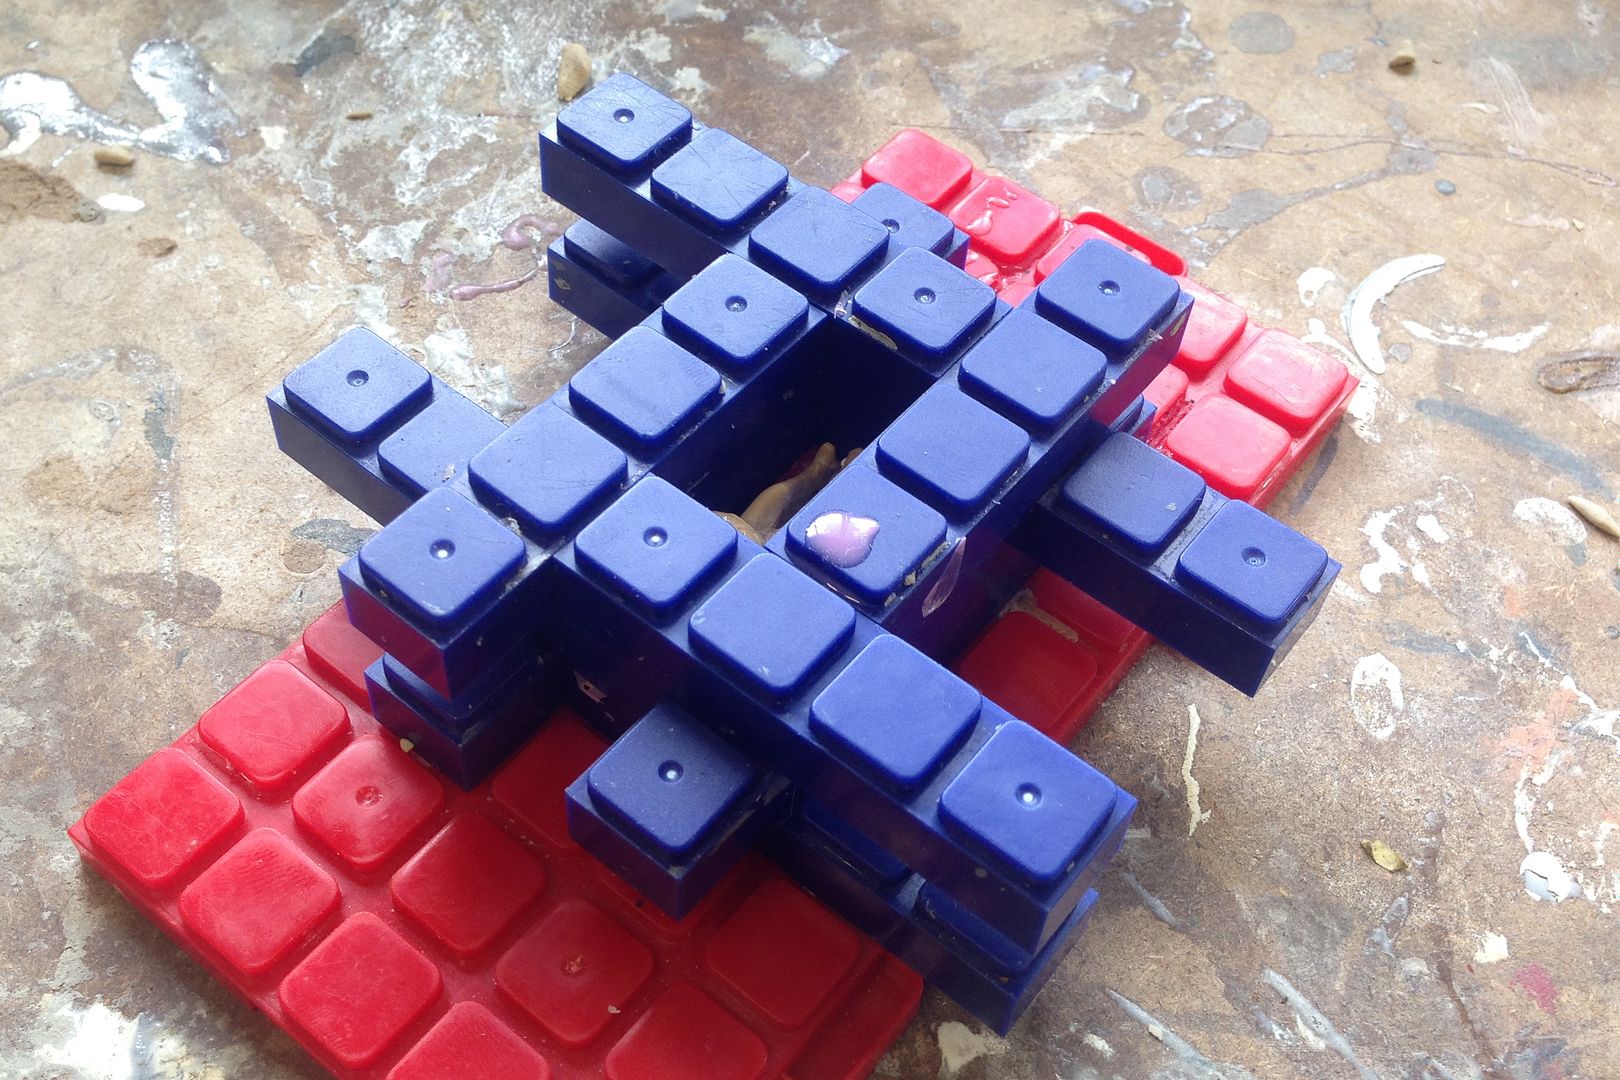
Filled it with de-gassed moulding silicone
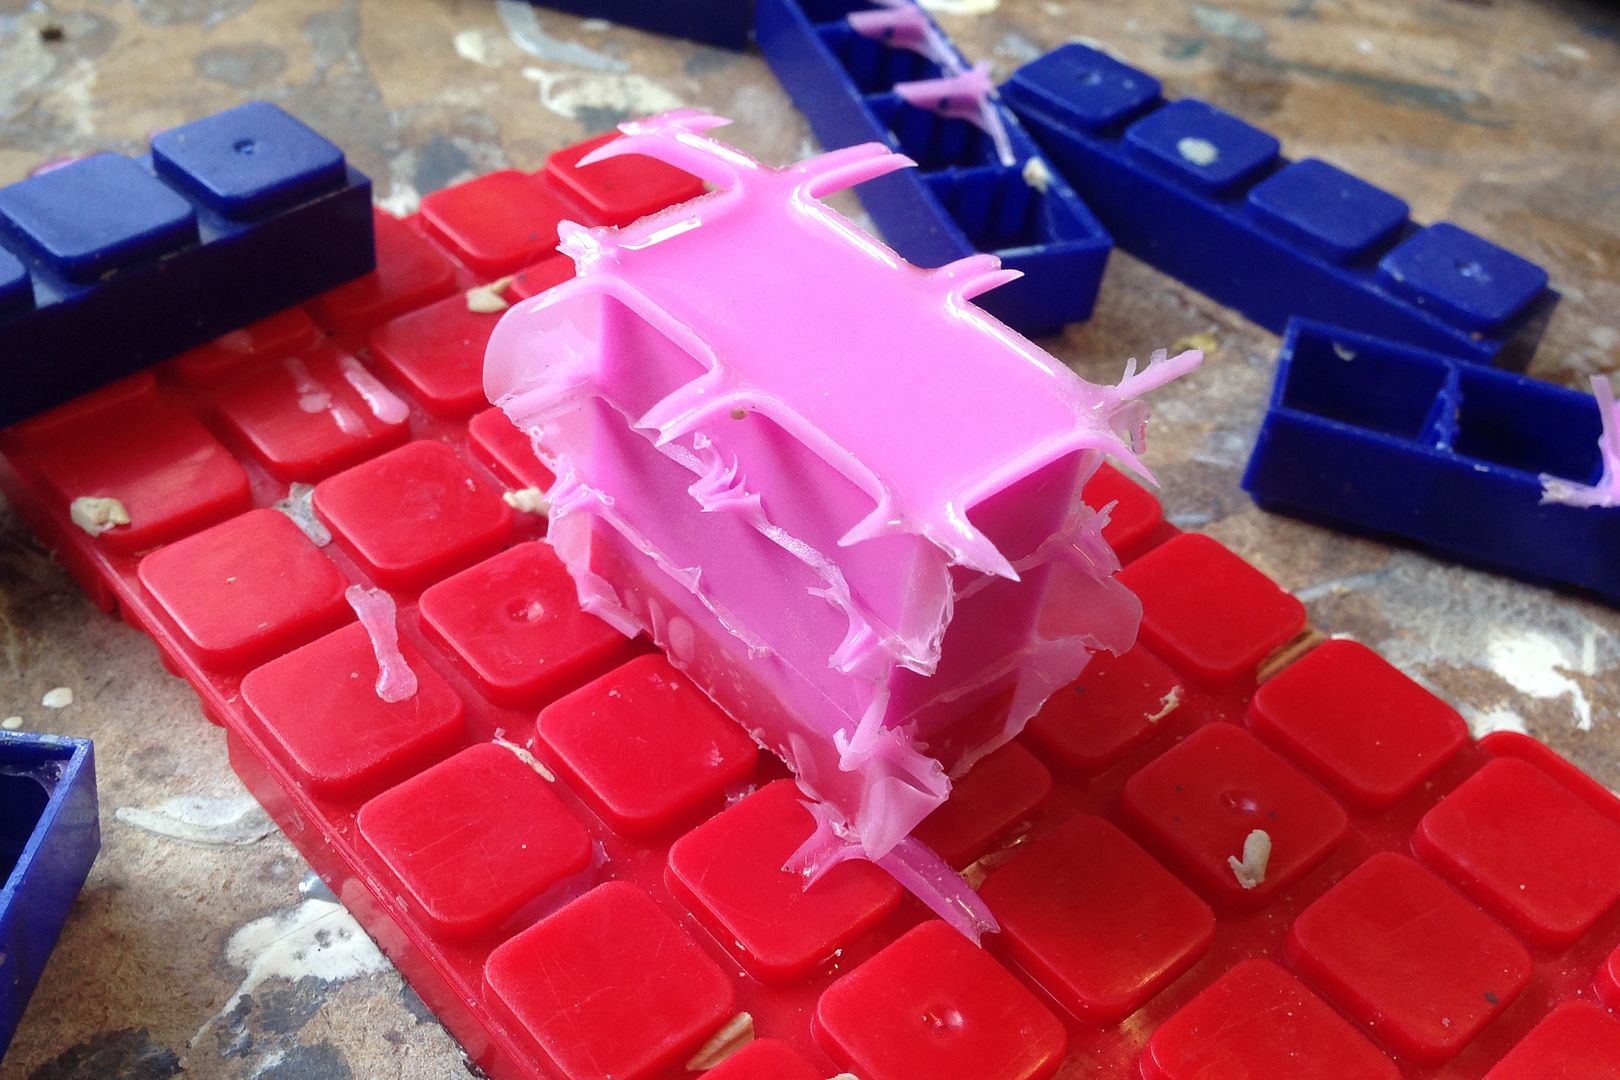
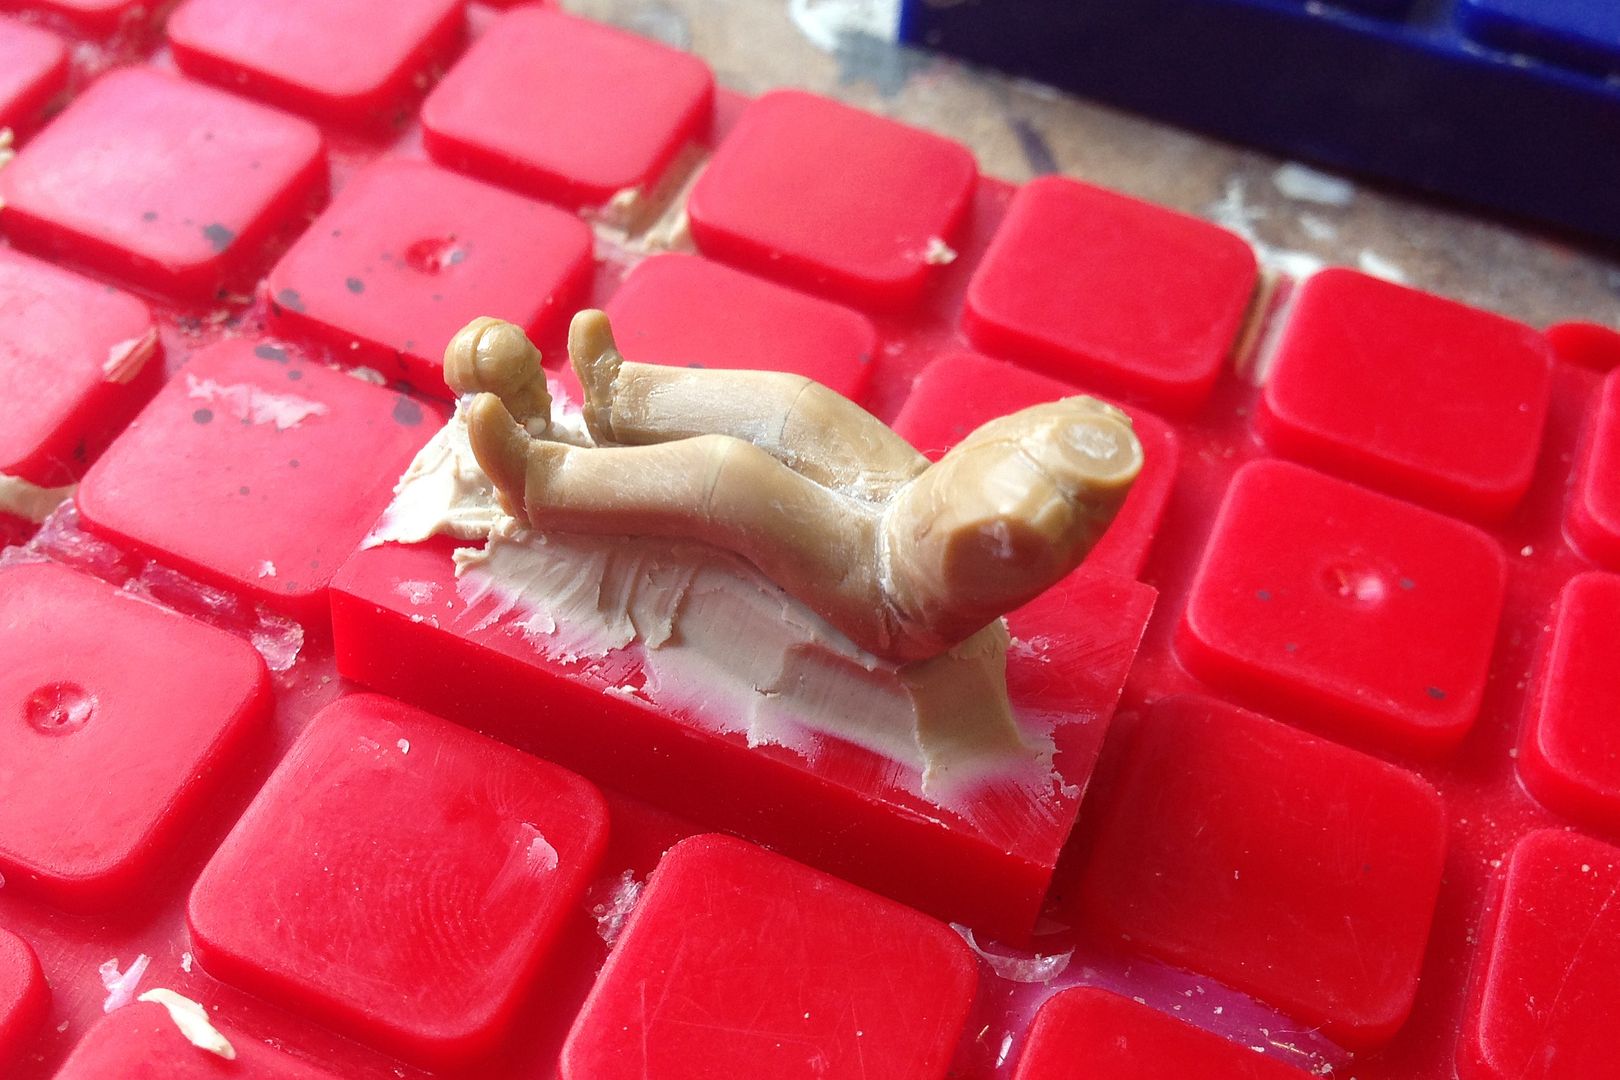
Here is the resulting part cast with pressurised resin.
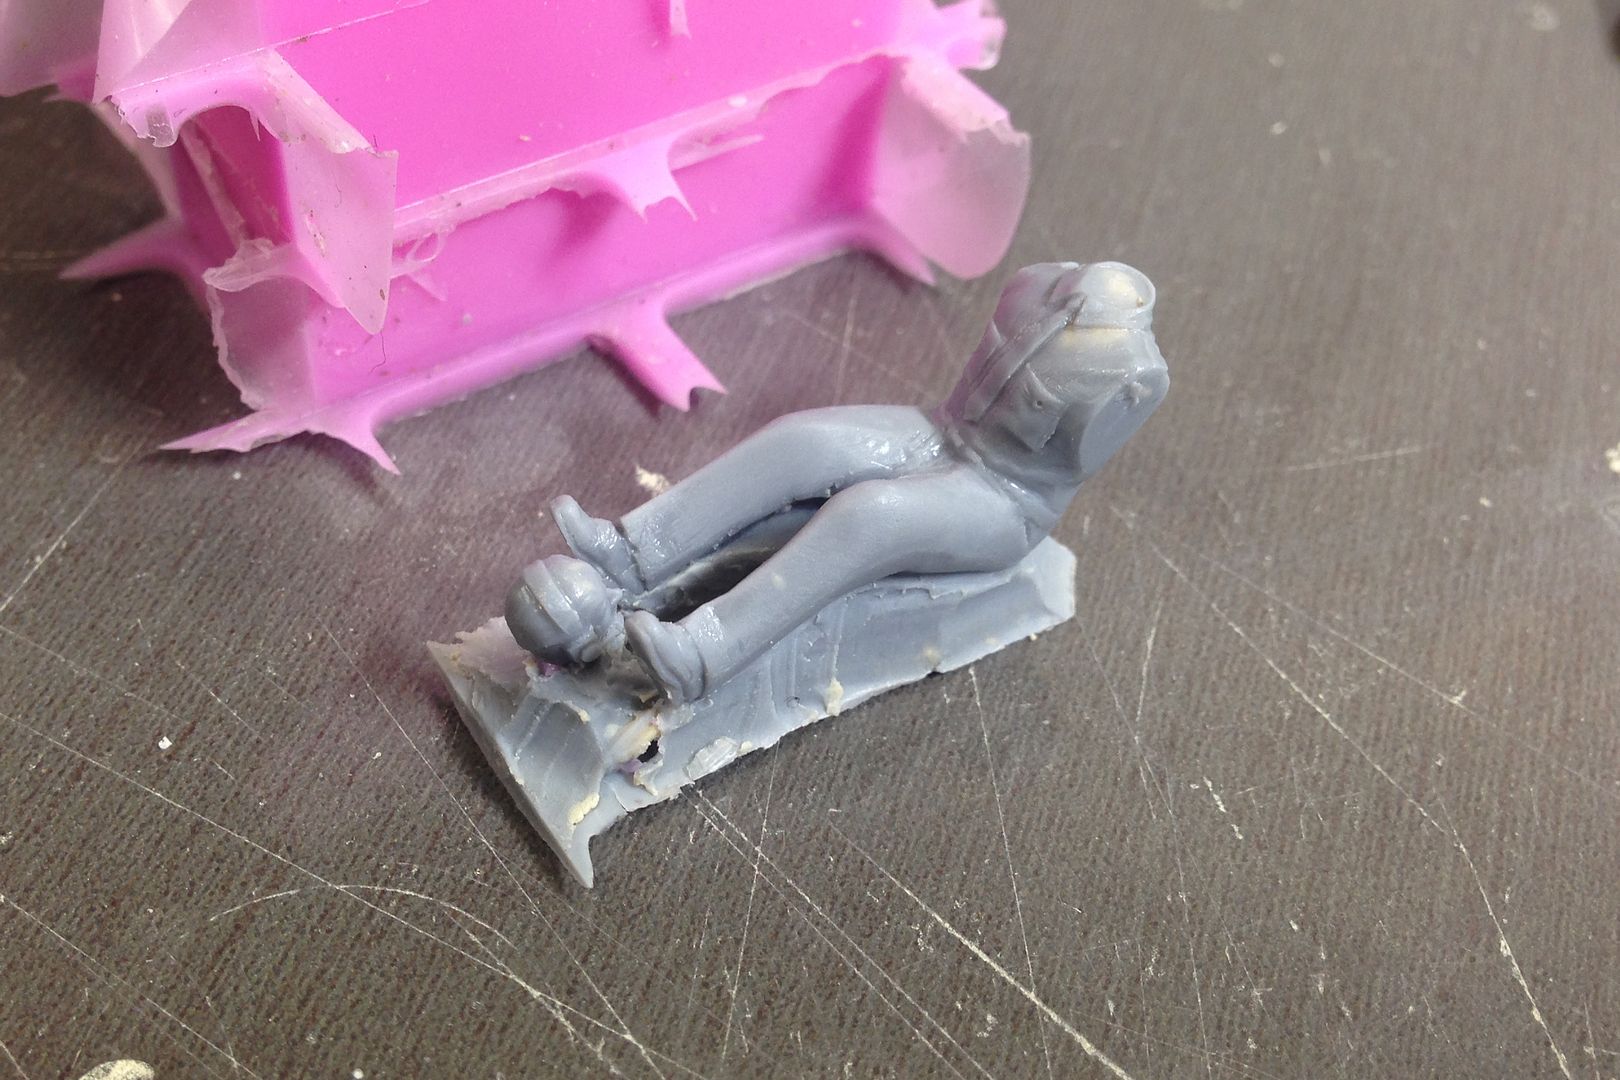
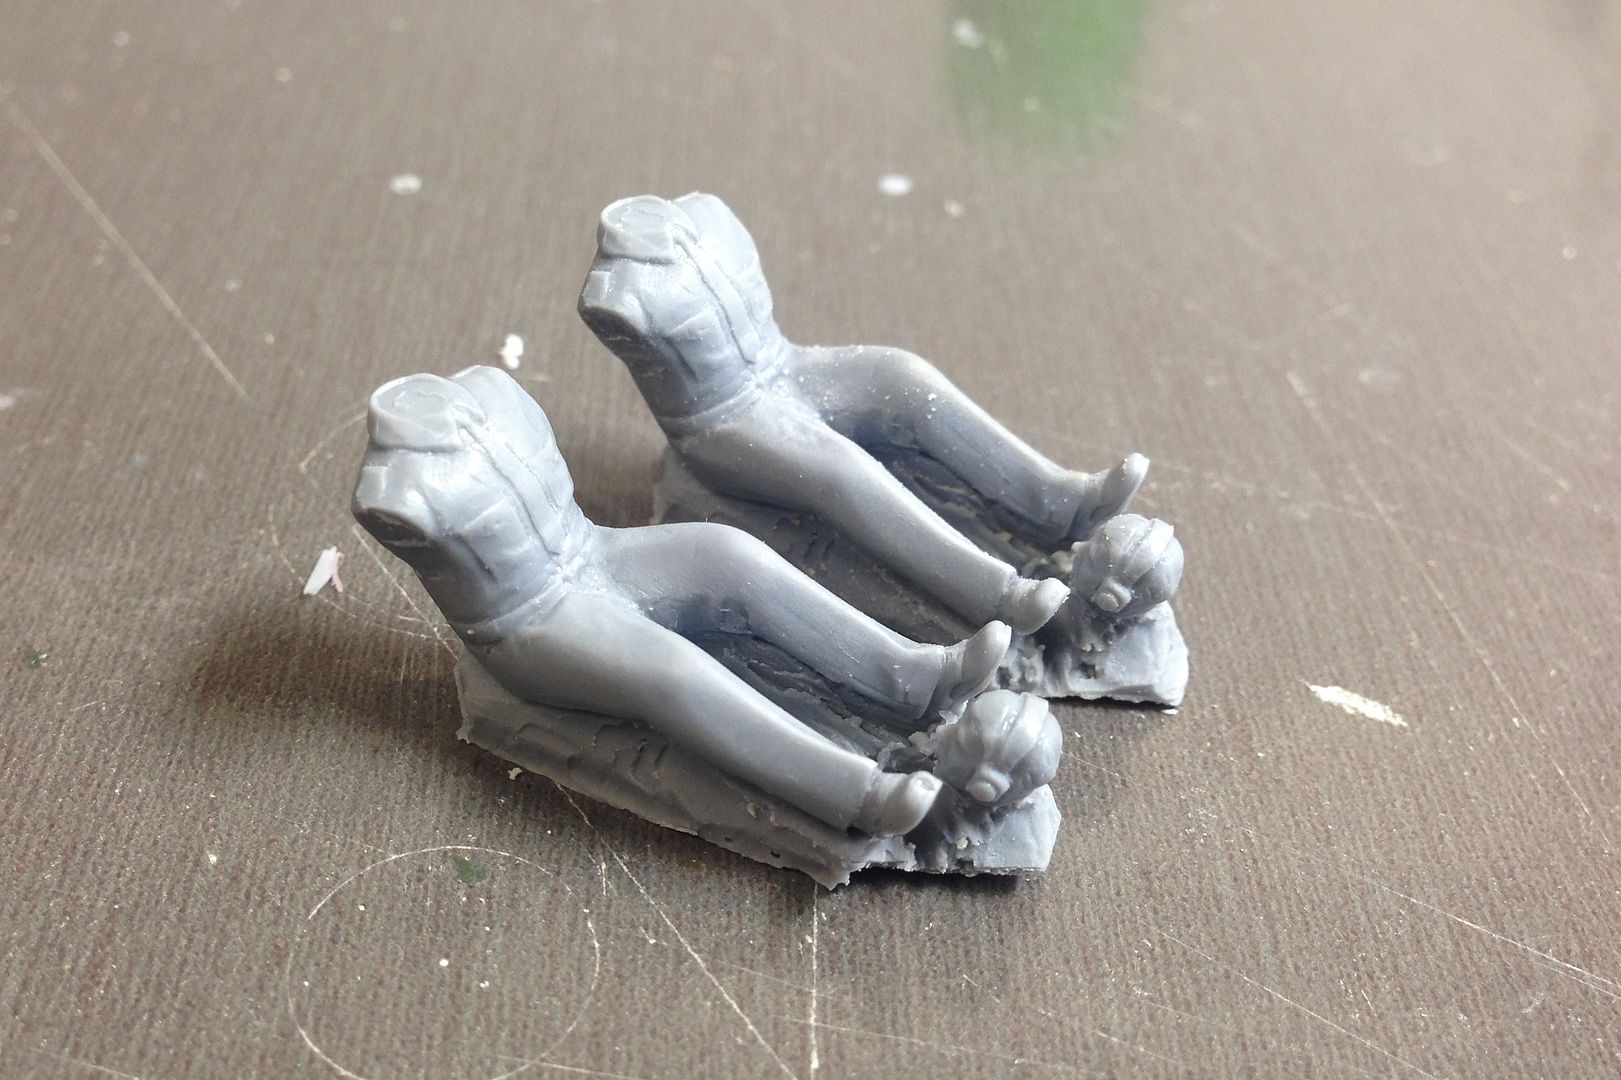
Here are 2 identical copies.
Here is where I am at with the flight crew. The captain and copilot are pretty well complete and now work has started on the flight engineer. The mixmatch of parts may change in the future depending on how they all integrate with each other. I still need to add some details and tidy up each figure, plus I am having a go at adding some weight to the flight engineer
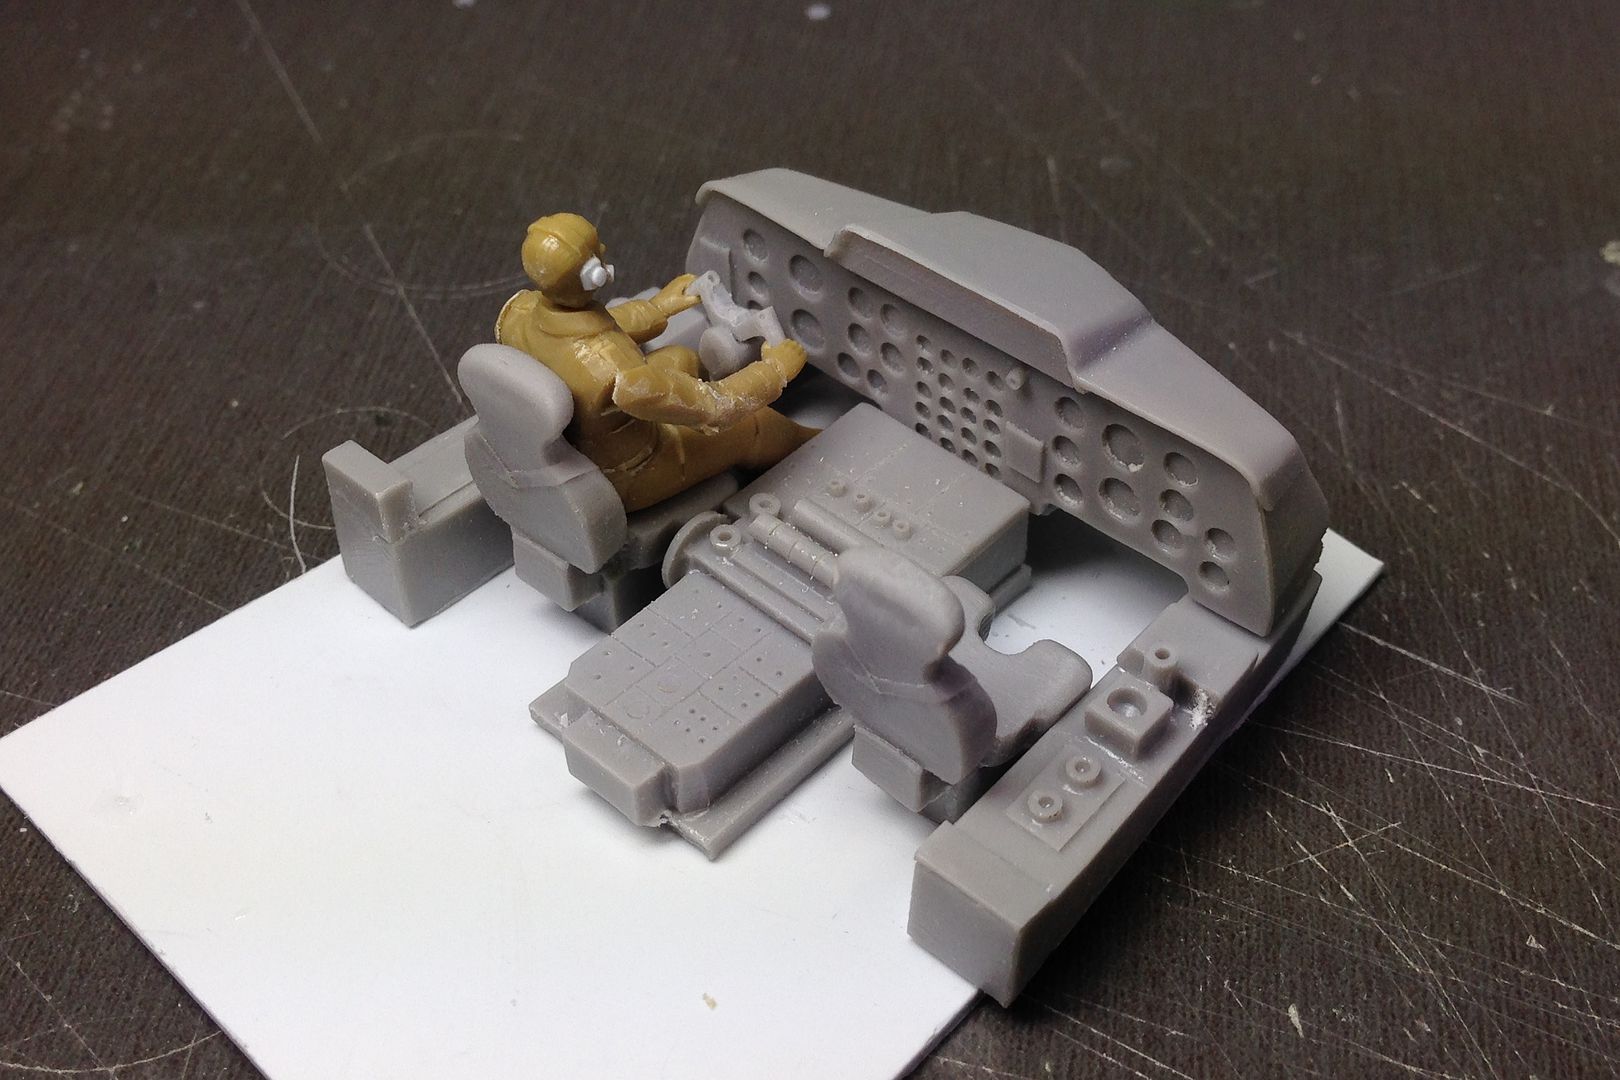
Here is a test fit of the three flight crew in a mock up of the cockpit. Details to note: the captain is pilot flying, the First Officer is pilot monitoring. I have studying various cockpit footage of Concorde taking off and think that this might be an appropriate set up. Considering that the aircraft has just rotated, the Captain is looking outside. The first officer is looking at the instruments and has his mouth open calling V2. The Flight Engineer has his chair swung towards the front and is monitoring the instruments and is prepared to activate the throttles etc. I know most of this wont be seen, but I feel that I may as well do this sort of stuff considering that it is a learning process for me and will also slow me down on the project somewhat. I am still considering who to put in the jump seat. Maybe a check captain?

Eric.
Moving on with the flight crew. I needed to start making copies of the parts that I have modified to make my job of filling the cockpit with crew figures a bit easier.
I made a small plinth from Modelers clay.

Boxed it in with the Gunze Sangyo casting block set.

Filled it with de-gassed moulding silicone


Here is the resulting part cast with pressurised resin.

Here are 2 identical copies.

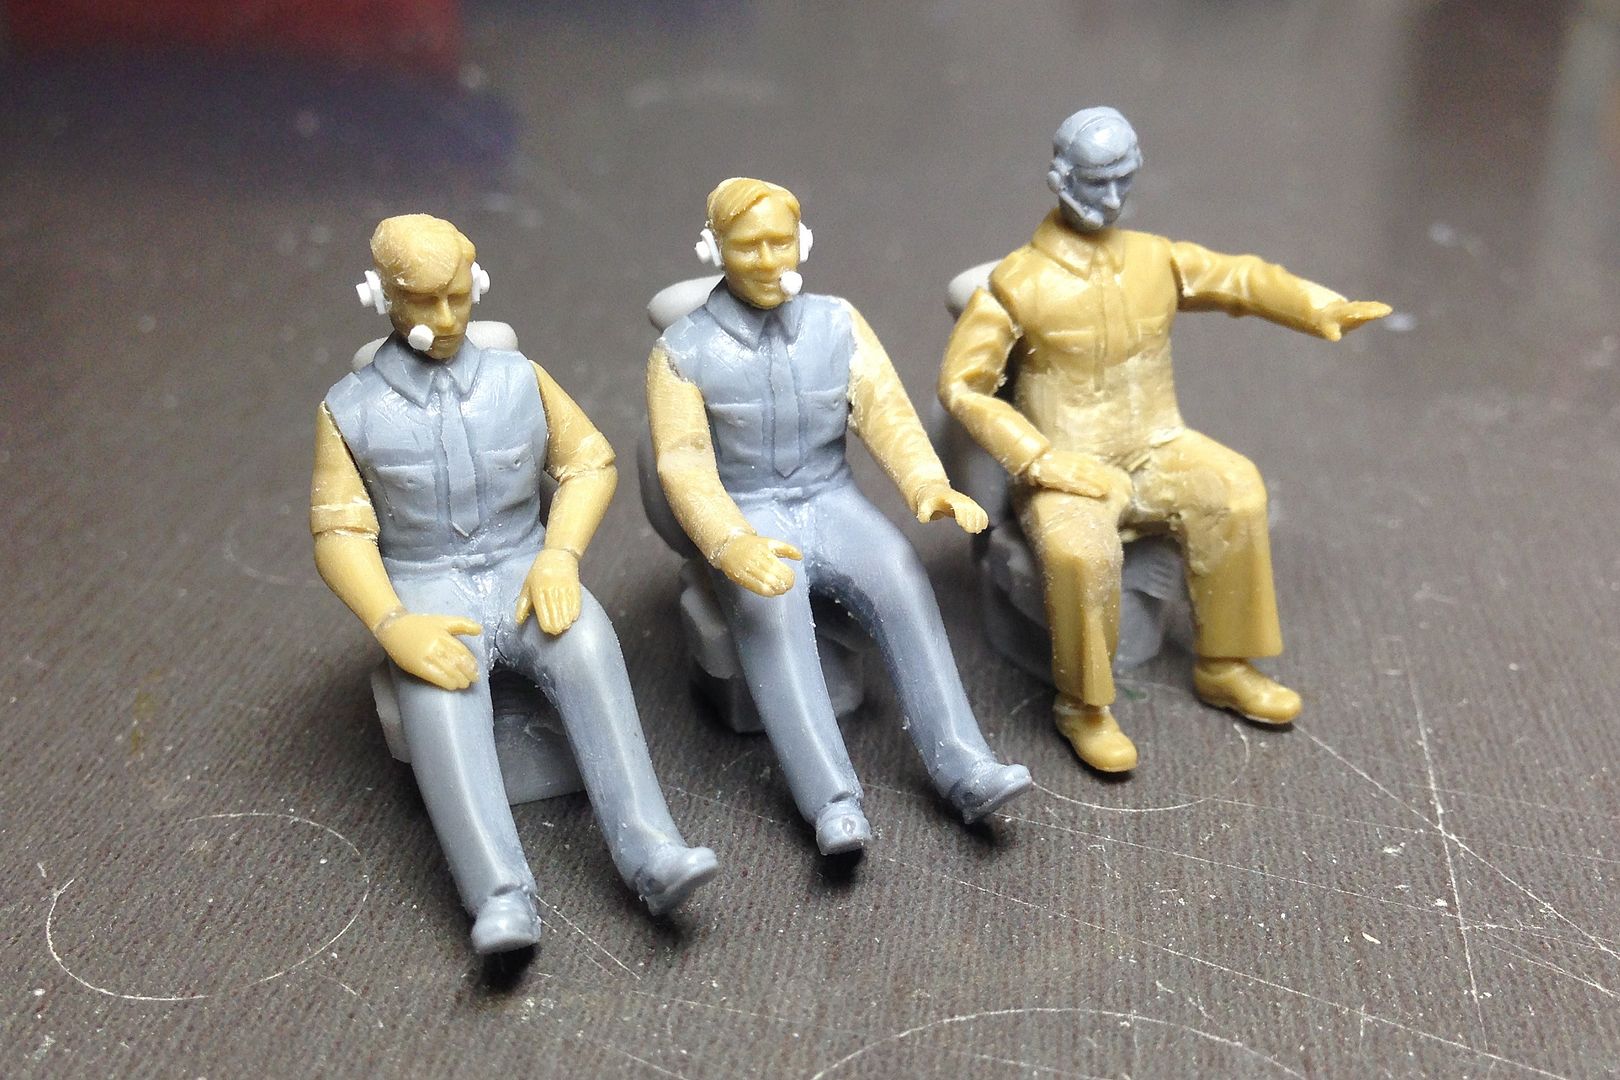
Here is where I am at with the flight crew. The captain and copilot are pretty well complete and now work has started on the flight engineer. The mixmatch of parts may change in the future depending on how they all integrate with each other. I still need to add some details and tidy up each figure, plus I am having a go at adding some weight to the flight engineer

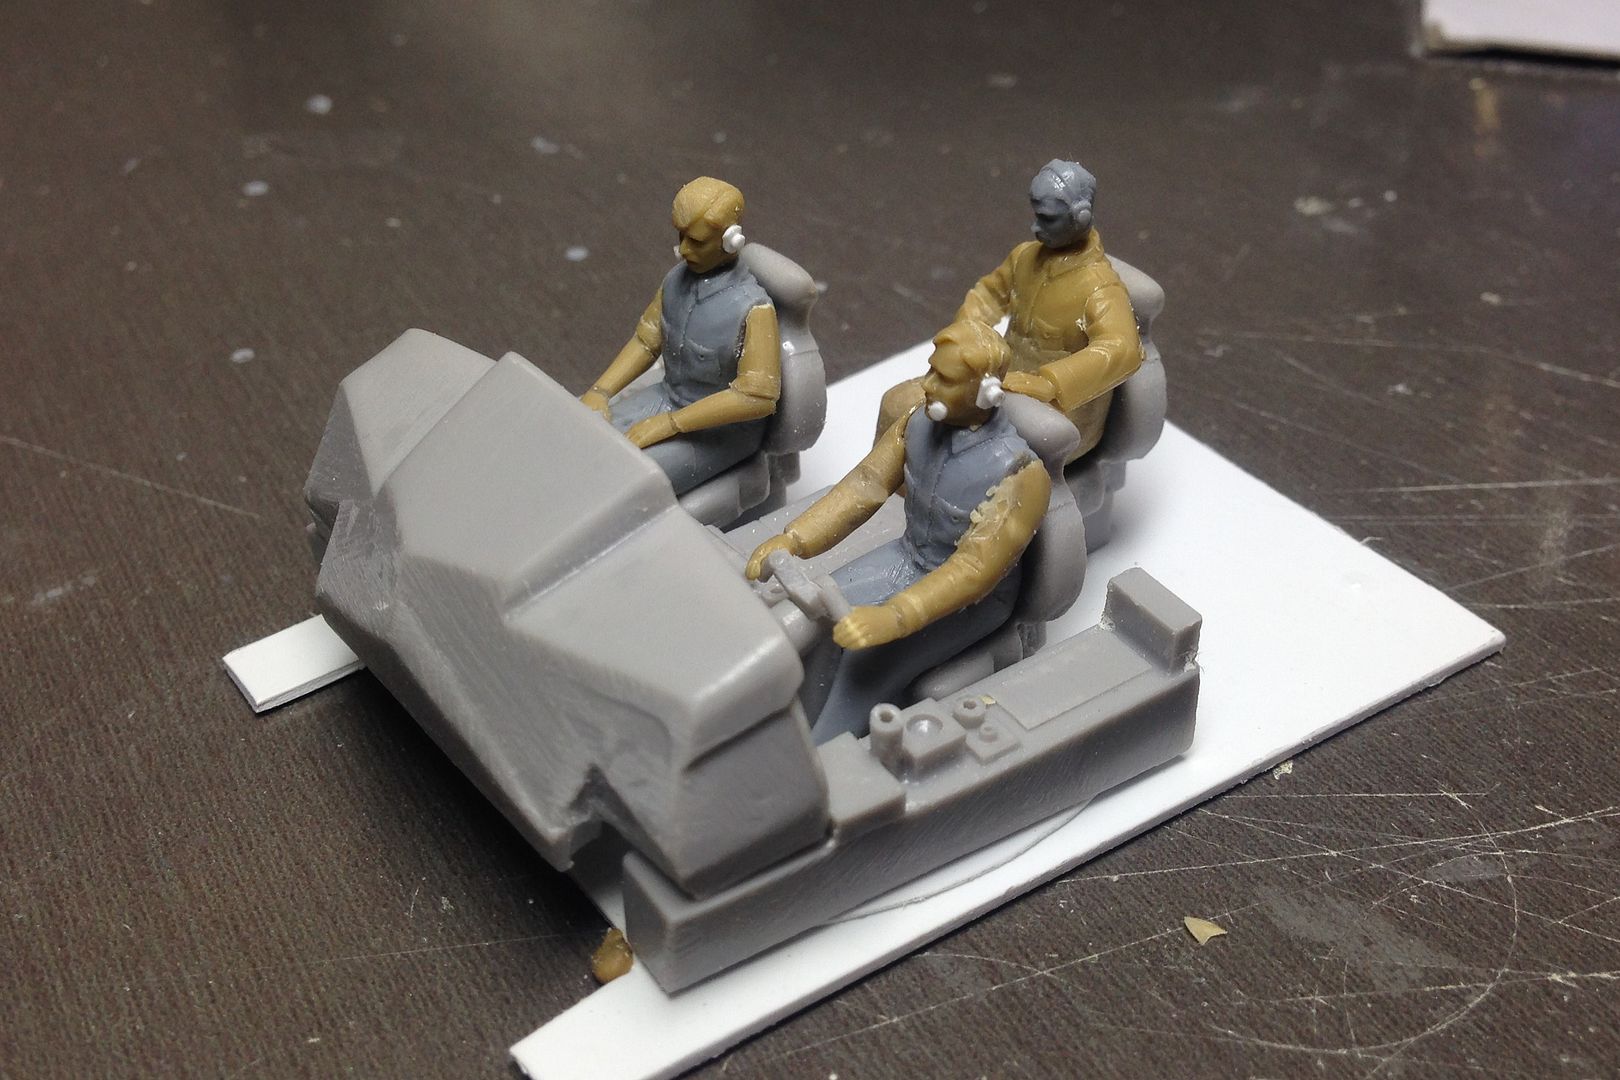
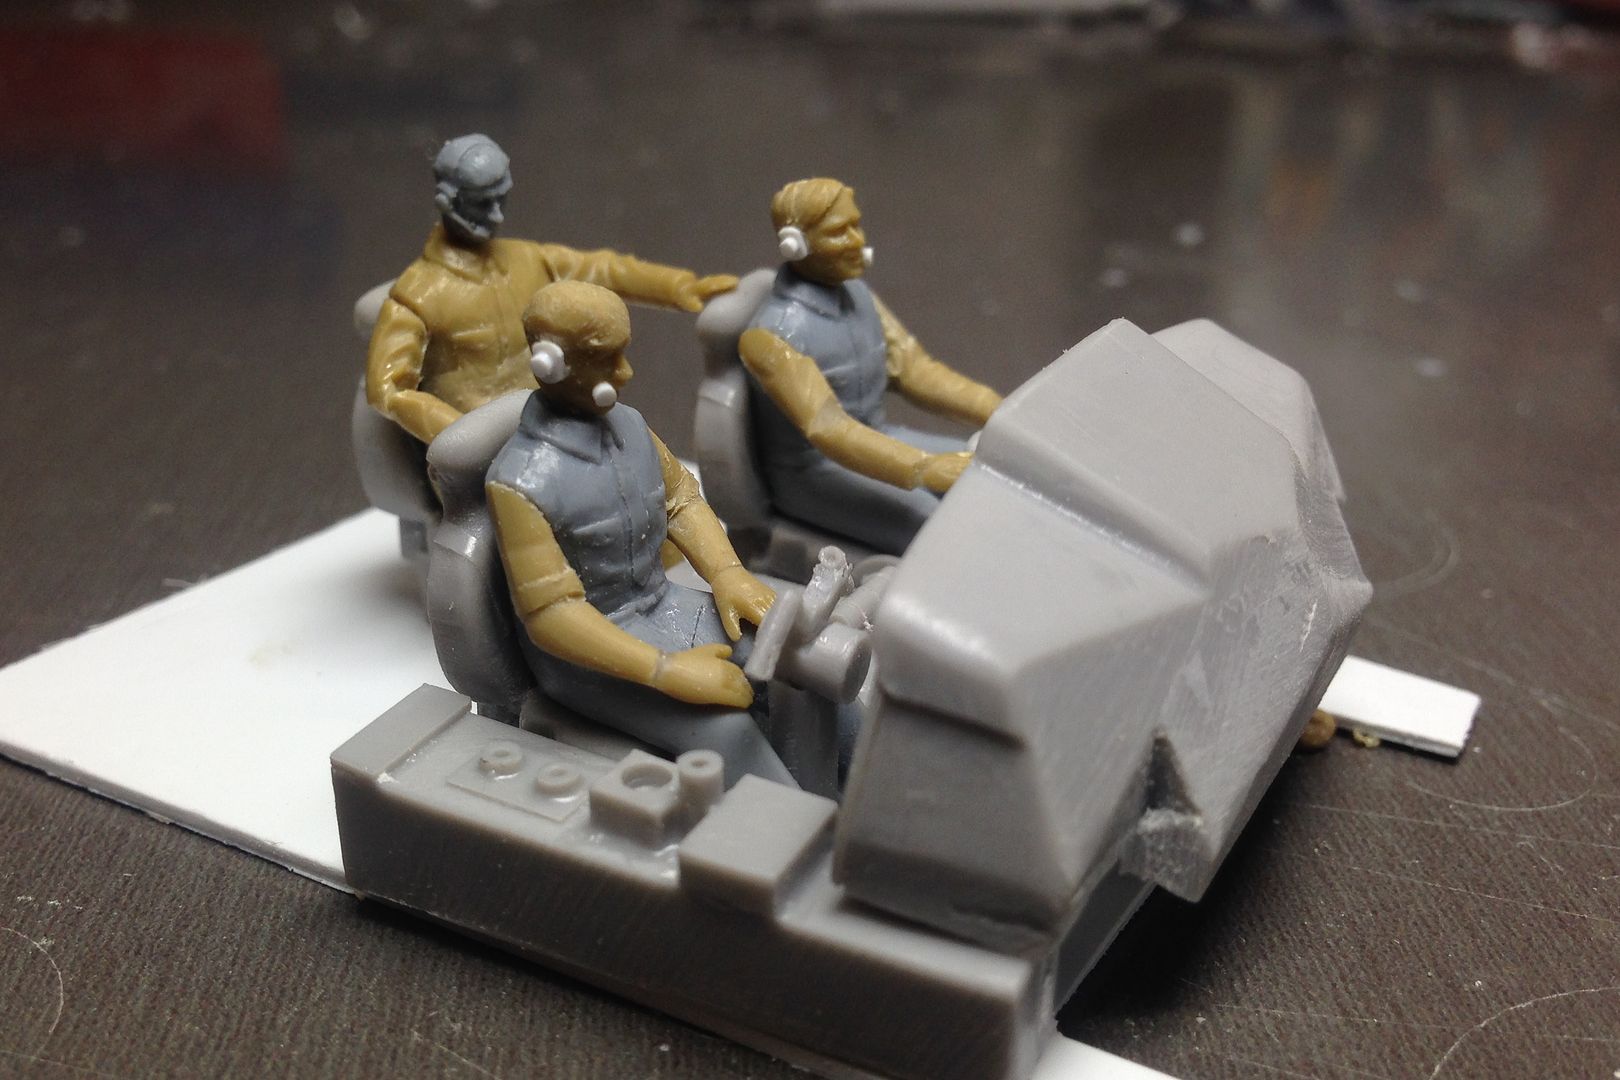
Here is a test fit of the three flight crew in a mock up of the cockpit. Details to note: the captain is pilot flying, the First Officer is pilot monitoring. I have studying various cockpit footage of Concorde taking off and think that this might be an appropriate set up. Considering that the aircraft has just rotated, the Captain is looking outside. The first officer is looking at the instruments and has his mouth open calling V2. The Flight Engineer has his chair swung towards the front and is monitoring the instruments and is prepared to activate the throttles etc. I know most of this wont be seen, but I feel that I may as well do this sort of stuff considering that it is a learning process for me and will also slow me down on the project somewhat. I am still considering who to put in the jump seat. Maybe a check captain?


Eric.
- Ericg
- Posts: 214
- Joined: Mon Apr 14, 2014 7:30 pm
Return to Member's Works in Progress
Who is online
Users browsing this forum: No registered users and 11 guests